LED Light Strips: Where to Cut for Custom Lengths
LED light strips are a popular and innovative way to add accent lighting to your home or workspace. They offer a wide range of colors, brightness levels, and customizable lengths, making them a versatile lighting solution for any space. However, many people are unsure of how to cut LED light strips to fit their specific needs. In this article, we will explore the best practices for cutting LED light strips and where to make the cuts for custom lengths. LED light strips are incredibly easy to install and can be cut to fit any size or shape of space. They are flexible and can be bent around corners, making them perfect for under-cabinet lighting, accent lighting, and even outdoor lighting. However, it is essential to know where to make the cuts to ensure that the LED light strips still function correctly and maintain their brightness levels. Whether you are an experienced electrician or a DIY enthusiast, cutting LED light strips can be done with just a few simple steps and the right tools. So, let’s dive into the world of LED light strips and discover where to cut for custom lengths.
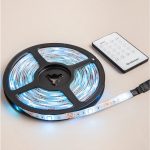
LED light strips are a flexible and versatile lighting solution that can be used in many applications. These strips consist of tiny LED bulbs that are mounted onto a thin, flexible circuit board. They are available in a variety of colors and can be cut to fit any size or shape. LED light strips are energy-efficient and long-lasting, making them an ideal choice for both residential and commercial settings. They are commonly used for accent lighting, under-cabinet lighting, and mood lighting. When it comes to customizing the length of LED light strips, it is important to know where to cut in order to avoid damaging the circuit board and the LED bulbs.
Cutting LED light strips to custom lengths is an integral part of any lighting project. It allows for precise customization of lighting fixtures to fit any space, regardless of its shape or size. Cutting LED light strips also helps to reduce waste, as it allows for the use of only the necessary amount of material, thereby minimizing cost and environmental impact. Moreover, custom cutting ensures that the LED lights are positioned in the right place, which can enhance the visual appeal of the lighting project. Through cutting to custom lengths, the LED light strips can be tailored to fit any design vision, whether it is for home or commercial use. Ultimately, cutting LED light strips to custom lengths is essential for achieving a professional and polished look in any lighting project.
Factors to Consider before Cutting LED Light Strips
Before you start cutting your LED light strips, it’s essential to consider several factors to ensure that you get the best results. First, take note of the specific LED light strip you are cutting. Each LED light strip has unique features that determine how it should be cut. Some LED light strips can only be cut at specific points, while others can be cut at any point along their length. Therefore, it’s crucial to read the manufacturer’s instructions carefully and understand the recommended cutting points for the LED light strips you are using. This will save you the frustration of damaging your LED light strip and wasting your money. Another factor to consider before cutting your LED light strips is the length that you want. You should measure the exact length of the area you want to light up before cutting your LED light strip to avoid cutting it too short or too long. Additionally, you should factor in the length of the connectors and wires that you will use to connect the LED light strips to each other or to a power source. Cutting your LED light strip before taking these factors into account can result in a poor installation, which may be challenging to fix. Therefore, it’s essential to plan and measure carefully before you start cutting your LED light strips.
Determining the appropriate length for your LED light strip project is crucial to ensure a successful outcome. It’s essential to measure the space where you intend to install the strip and add a few extra inches to allow for any curves or bends. Cutting the strip to the desired length can be a bit tricky, as it must be done at specific intervals to avoid damaging the strip or disrupting the electrical flow. Thankfully, most LED light strips have designated cut points, which can be easily identified by a dotted line or scissors icon. Once the appropriate length has been measured and cut, the strip can be easily installed for a custom fit and stunning visual effect.
When it comes to cutting LED light strips, it’s important to do so without damaging the circuit. The circuit is what allows the LED lights to function properly, so it’s crucial to cut in the right place. Before making any cuts, it’s important to measure the length needed and locate the designated cut line on the strip. Use sharp, clean scissors or a sharp blade to make a clean cut along the designated line. It’s important to avoid cutting any of the copper contacts or circuit pathways. Cutting in the wrong place could result in malfunctioning lights or even permanent damage to the LED strip. By taking the time to carefully cut in the right place, you can create custom lengths of LED light strips without sacrificing functionality or efficiency.
Voltage drop is an important concept to understand when working with LED light strips. As electricity travels through a wire, some of the energy is lost due to resistance in the wire. This loss of energy is known as voltage drop, and it can be a significant factor when working with longer lengths of LED light strips. When voltage drop occurs, the LEDs at the end of the strip may be dimmer than those at the beginning, which can affect the overall appearance and functionality of the lighting. To minimize voltage drop, it’s important to use the proper gauge of wire for the length of the strip and to avoid cutting the strip in the wrong places. By understanding voltage drop and taking steps to prevent it, you can ensure that your LED light strips will provide consistent and reliable lighting for your project.
Where to Cut LED Light Strips
LED light strips are a fantastic way to add a touch of ambiance and style to any room or space. One of the great benefits of LED light strips is that they can be cut to custom lengths, making them a versatile lighting solution for any project. However, it’s important to know where to cut LED light strips to ensure they function correctly and don’t get damaged in the process. When it comes to cutting LED light strips, it’s essential to follow the manufacturer’s instructions carefully. Most LED light strips have designated cut marks where cuts can be made safely. Cutting the LED light strip in the wrong place can damage the circuitry and make it difficult to connect to a power source. Additionally, cutting the strip in the wrong place can also result in the light output being uneven or not working at all. Therefore, it’s crucial to measure the space where the LED light strip will be installed and follow the manufacturer’s instructions for cutting it to the correct length. In conclusion, cutting LED light strips to custom lengths is a great way to make them versatile for any project. However, it’s important to follow the manufacturer’s instructions carefully to ensure the LED light strip functions correctly and doesn’t get damaged in the process. By following these guidelines, you can create a custom lighting solution that adds a touch of style and ambiance to any space.
When it comes to LED light strips, cutting marks are an essential aspect of customization. These marks indicate where the strip can be cut to achieve the desired length, making it an ideal lighting solution for a wide range of applications. The cutting marks are usually clearly indicated on the strip, and they can be found at regular intervals, allowing for precise measurements. Cutting the strip is a simple process that can be done with a pair of scissors or a sharp knife, and it does not require any special skills or tools. With the ability to cut the LED light strip to any length, users can create customized lighting solutions that fit their specific needs and preferences.
Cutting LED light strips at specific intervals is essential for achieving the desired length for your lighting project. The LED strips come in predetermined lengths, but they can be customized to fit any space. However, it is crucial to cut the strips at the designated marking points to ensure that they function correctly. Cutting the strips incorrectly can lead to malfunctioning, including flickering or dimming of the lights. To ensure that your LED light strips function optimally, it is essential to use the right tools and follow the manufacturer’s guidelines. By doing so, you can create custom lengths that fit the unique requirements of your space, providing a functional and aesthetically pleasing lighting solution.
Cutting LED light strips is a crucial step in achieving custom lengths for your lighting needs. When cutting in between LED lights, it’s important to use sharp scissors or a sharp blade to avoid damaging the circuit board. Make sure to cut along the designated cutting marks, which are usually indicated by a dotted line or scissors icon on the strip. It’s also essential to disconnect the power source before cutting to prevent electrical shock. Once cut, the strip can be reconnected to the power source using connectors or soldering. Cutting in between LED lights allows for flexibility and customization for any space, making it a popular choice for home and commercial lighting solutions.
Steps for Cutting LED Light Strips

LED light strips are a popular choice for those who wish to add a touch of illumination to their homes or offices. However, it is often necessary to cut these strips to fit a particular space or design. Fortunately, cutting LED light strips is a relatively simple process that can be accomplished with a few basic tools. The first step is to measure the length of the area where the LED strip will be placed. This will help determine how much of the strip needs to be cut. Once the length has been determined, use a pair of scissors or a sharp knife to cut the strip along the designated cut lines. It is important to note that not all LED light strips can be cut, so it is important to check the manufacturer’s instructions before attempting to do so. The next step is to reattach the cut strip to the power source. This can be done by soldering the cut ends together or by using a connector. If soldering is the chosen method, it is important to ensure that the wires are properly aligned and that the solder has melted and adhered to both ends. If a connector is used, it should be attached securely to the cut ends of the LED strip, and any excess wire should be trimmed. Once the strip is reconnected to the power source, it can be tested to ensure that it is functioning properly. By following these simple steps, anyone can cut and customize LED light strips to fit their specific needs and design preferences.
When it comes to cutting LED light strips for custom lengths, having the right tools is essential. The most important tool you’ll need is a pair of sharp scissors or wire cutters. It’s important to use a tool with a sharp blade to ensure a clean cut that won’t damage the strip’s electrical components. Additionally, a ruler or measuring tape can be helpful in measuring the desired length of the strip before cutting. For more precision, a cutting guide or template can also be used to ensure straight cuts. Lastly, if you plan on soldering the cut ends of the strip to connectors or wires, a soldering iron and solder will be necessary. By having these tools on hand, you can easily customize your LED light strips to fit any space or project.
When it comes to cutting LED light strips for custom lengths, it is important to take safety precautions. First, make sure the lights are unplugged and the power source is turned off to avoid any electrical shocks. Wear protective eyewear and gloves to avoid any injuries while handling tools. Use a sharp cutting tool, such as a pair of scissors or a utility knife, to ensure a clean cut. Additionally, be mindful of where you are cutting to avoid damaging any electrical components or wires. Taking these safety measures will not only protect you from harm but also ensure that your LED light strips are cut to the desired length without any issues.
If you’re looking to customize the length of your LED light strips, cutting them is a relatively simple process. First, measure the area you want to install the strip and mark where you need to make the cut. Next, use a sharp pair of scissors or a cutting tool to cut along the designated line. Make sure to cut at the designated cutting points, which are typically indicated by a scissor icon or a dotted line. If you want to reuse the cut piece, make sure to save the end connector before cutting. After cutting, attach the end connector to the newly cut end of the LED strip and connect it to the power source. With these steps, you can easily customize your LED light strips to fit your unique lighting needs.
In summary, LED light strips offer an easy and versatile way to add lighting to any space, and cutting them to custom lengths is a great way to ensure a perfect fit. When cutting LED light strips, it’s important to use the proper tools and techniques to avoid damaging the circuitry. Before cutting, measure the desired length and mark it with a pencil to ensure accuracy. Cut along the designated line using sharp scissors or a cutting tool, and be sure to cut only on the designated cut lines. Finally, attach the necessary connectors or solder the wires back together to ensure proper functionality. With these tips, creating custom lengths of LED light strips is a simple and straightforward process.
Cutting LED light strips to custom lengths can offer a variety of benefits, including the ability to create personalized lighting solutions that perfectly fit your space. When you cut LED light strips to custom lengths, you can easily install them in any area, including curved or hard-to-reach places, without wasting any excess materials. Additionally, customizing your LED light strips allows for greater flexibility in design, as you can create unique patterns or shapes that suit your specific needs. Furthermore, cutting LED light strips can also help reduce energy consumption and save money, as you only need to use the exact amount of material required for your specific project. Overall, cutting LED light strips to custom lengths provides a range of benefits, making it an ideal option for anyone looking to create a unique and efficient lighting solution for their home or office.
In conclusion, cutting LED light strips to custom lengths is a relatively simple task that can be accomplished with a few basic tools and a bit of patience. However, it is important to take proper precautions and follow manufacturer instructions to avoid damaging the lights or causing a safety hazard. It may also be helpful to invest in additional accessories such as connectors or soldering equipment to ensure a secure and professional-looking installation. Overall, with the right approach and attention to detail, customizing LED light strips can add a unique and personalized touch to any space or project.
Conclusion
In conclusion, LED light strips offer a fantastic way to add ambiance and style to any space, and cutting them to custom lengths is a great way to ensure they fit perfectly. However, it’s crucial to cut them in the right places to avoid damaging the circuitry or ruining the lights’ functionality. It’s important to follow the manufacturer’s instructions and use the right tools to ensure a clean and precise cut. With the right attention to detail and a little bit of creativity, LED light strips can transform any room into a stunning and unique space. So go ahead and experiment with different lengths and placements, and let your imagination run wild!