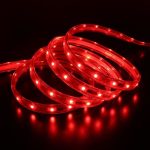
LED Light String Repair: Quick and Easy Solutions for Fixing Your Festive Decorations
The festive season is incomplete without a set of LED light strings shining bright in your home. But what happens when one of the bulbs stop working, or a section of the string goes dark? Instead of discarding the entire string and buying a new one, you can easily repair it with a few simple steps. In this article, we will explore some quick and easy solutions to fix your LED light string decorations, ensuring that they continue to shine brightly for many more festive seasons to come. LED light strings have become increasingly popular over the years due to their energy efficiency, durability and versatility. They are available in a wide range of colours, sizes and shapes, making them the perfect choice for any occasion or decor theme. However, like any other electrical item, LED light strings can malfunction, and finding the root of the problem can be a daunting task. But fear not, with a little bit of patience and the right tools, you can easily fix your LED light strings without having to spend a fortune. So let’s get started and learn some quick and easy solutions for fixing your festive decorations.
LED light strings have become increasingly popular in recent years due to their numerous advantages over traditional incandescent bulbs. Firstly, LED lights are much more energy-efficient and can last up to 50 times longer than incandescent bulbs. This means that they not only save you money on your electricity bill but also reduce your carbon footprint. Secondly, LED lights come in a range of colors and can be programmed to create a variety of lighting effects, making them ideal for festive decorations. Additionally, they are much safer than incandescent bulbs as they produce less heat and are less likely to cause a fire hazard. Overall, LED light strings are a great investment for anyone looking to decorate their home or garden with festive lighting.
It is crucial to repair LED light strings rather than throwing them away as it is an environmentally friendly option. Discarding electronics contributes to the growing electronic waste, which causes severe harm to the environment. Repairing these light strings not only helps in reducing electronic waste but also saves money. Throwing away and purchasing new light strings can be a costly affair, especially during the festive season. Repairing them ensures that the light strings can be used for many more years, saving money, and reducing the carbon footprint. Additionally, repairing these light strings can be a fun and engaging activity, providing a sense of accomplishment and satisfaction.
Identifying the Problem
Identifying the problem is the first step in repairing LED light strings. Before you can fix the lights, you need to know what’s wrong with them. One common problem is a burnt-out bulb. If one bulb is not working, it can cause the entire string of lights to go out. To find the burnt-out bulb, you should start by checking the wires and sockets for any signs of damage. Then, you can use a tester to check each bulb individually until you find the one that’s not working. Once you’ve identified the burnt-out bulb, you can replace it and the string of lights should be working again. Another common problem with LED light strings is a broken wire. If the wires inside the lights are damaged, they can cause the lights to flicker or not work at all. To identify a broken wire, you should start by checking the wires and sockets for any signs of damage. Then, you can use a tester to check each section of the wire until you find the one that’s broken. Once you’ve identified the broken wire, you can splice it back together or replace the section of wire altogether. By identifying the problem and fixing it, you can save yourself from having to buy a new set of lights and keep your festive decorations shining brightly.
LED light strings are a popular choice for festive decorations. However, like any electronic device, they can experience issues over time. One common issue is flickering lights, which can be caused by a loose connection or a faulty bulb. Another issue is a string that won’t light up at all, which can be due to a broken wire or a blown fuse. Additionally, some LED light strings may have a dimmer glow than usual, which is often the result of a low voltage power source. These issues can be frustrating, but fortunately, there are several quick and easy solutions for fixing your LED light strings and restoring them to their full festive glory.
One of the essential steps in repairing your LED light strings is identifying the problem. To do this, you will need a few tools. First, a multimeter will come in handy to determine if there is an electrical connection problem. Additionally, a continuity tester can help you identify where the breakage is in the wire. A voltage tester will confirm if the power source is working correctly. You may also need wire strippers to expose the wire for repairs. Finally, a soldering iron will be required to fix any broken wires. With these tools, you can quickly and easily identify and fix any issues with your LED light strings, ensuring your festive decorations shine bright for years to come.
Fixing Loose or Broken Bulbs

Loose or broken bulbs can be a common issue when it comes to LED light strings. It can be frustrating to have one or more bulbs not working, especially during the festive season. However, fixing loose or broken bulbs is a relatively simple task that requires minimal effort and tools. The first step is to identify the faulty bulb by turning on the lights and checking which bulb or bulbs are not lit. Once you have identified the problematic bulb, gently remove it from the socket and check if the filament is broken or if the bulb is loose. If the filament is broken, replace the bulb with a new one. If the bulb is loose, gently push it back into the socket and ensure it is securely in place. It is also important to check the surrounding bulbs to ensure they are not loose or broken, as this can cause further issues with the light string. If you are unable to locate the faulty bulb or if there are multiple bulbs not working, it may be best to use a light tester to identify the problematic bulbs. A light tester can be purchased from most hardware stores and can quickly identify which bulbs are not working. Once you have identified the faulty bulbs, follow the same steps as above to replace or secure them. It is important to ensure that the light string is unplugged before attempting any repairs and to handle the bulbs with care to avoid any damage. By following these simple steps, you can quickly and easily fix loose or broken bulbs and have your LED light string shining brightly once again.
If you’re dealing with a loose or broken bulb in your LED light string, don’t worry, it’s an easy fix! Start by unplugging the string of lights and inspecting the bulb that’s causing the issue. If it’s loose, gently wiggle it back into place. If it’s broken, carefully remove it from the socket and replace it with a new one of the same size and style. Take care not to damage the wire or other bulbs as you work. Once you’ve replaced the bulb, plug the string back in and test it to make sure all the lights are working properly. With these simple steps, you’ll have your LED light string shining bright again in no time.
When it comes to repairing an LED light string, having the right tools is essential. Some of the basic tools you will need include a multimeter to test the voltage and continuity of the light strands, wire strippers to remove the insulation from the wire ends, and soldering equipment to reconnect broken wires. You may also need a heat gun or a hot glue gun to secure connections and insulate the wires. A magnifying glass and a pair of tweezers can be helpful in identifying small issues and making precise repairs. With these tools in hand, you can confidently tackle any LED light string repair task and get your festive decorations shining brightly once again.
Replacing Fuses

Replacing fuses in LED light strings is a straightforward process that can save you from the hassle of buying a new set of lights. The first step is to identify the fuse in the plug. Usually, it is located near the prongs of the plug and can be accessed by sliding a cover or unscrewing a cap. Once you have removed the fuse, check if it is blown. A blown fuse will appear black or have a broken filament inside. If it is blown, replace it with a new fuse of the same rating. Be sure to use only the recommended fuse type to avoid any safety hazards. Once the fuse is replaced, plug in the light string and test it to ensure it is working correctly. It is essential to remember that only replaceable fuses should be replaced. Some LED light strings have non-replaceable fuses, which means that the entire light string needs to be replaced if the fuse is blown. Additionally, if you have checked the fuse and it is not blown, the issue may be with the LED bulbs themselves. In this case, it may be more cost-effective to purchase a new set of lights instead of trying to repair them. Overall, replacing fuses is a simple and cost-effective solution for fixing your festive LED light strings.
Fuses are an essential component in LED light strings, as they protect the circuit from electrical overload or short circuits. When an excessive amount of current flows through the circuit, the fuse will melt and break the connection, preventing any further damage to the LED lights. This is achieved by using a thin wire housed within a heat-resistant casing that will melt when the current exceeds a certain level. It is essential to replace the blown fuse with a new one with the same specification to ensure the proper functioning of the LED light string. Fuses are an excellent safety mechanism that can prevent any potential electrical hazards and keep your LED light strings working correctly.
If you’re having trouble with your LED light string, it could be due to blown fuses. Luckily, replacing fuses is a quick and easy process. First, unplug the light string and remove any damaged bulbs. Then, locate the fuse compartment on the plug and open it using a screwdriver or a small coin. Check the fuse for any signs of damage or discoloration, and if necessary, replace it with a new fuse of the same amperage. Finally, close the fuse compartment and plug the light string back in to test if it’s working properly. By following these step-by-step instructions, you can easily replace blown fuses and get your LED light string back to shining brightly in no time.
Repairing the Wiring
If you’re facing issues with your LED light string, repairing the wiring is often the solution. This process can be done relatively easily, but it requires some patience and attention to detail. The first step is to identify the problematic bulb or section of the string. Once you’ve located the issue, you can begin to strip the insulation from the wire, being careful not to damage the wires themselves. You can then use wire connectors or electrical tape to reattach the wires and restore the proper flow of electricity. It’s important to test the string before sealing it back up to ensure that everything is working correctly. While repairing the wiring on your LED light string may seem daunting at first, it’s a relatively simple process that can save you time and money. By taking the time to carefully inspect the string and identify the problematic area, you can fix the issue without having to replace the entire string. This is especially important during the holiday season when LED light strings are a popular decoration choice. Don’t let a few problematic bulbs ruin your festive spirit – with a little patience and attention to detail, you can have your LED light string shining brightly once again.
There are several reasons that can lead to wiring issues in LED light strings. One of the most common causes is excessive strain on the wires due to twisting, bending, or pulling them too hard. This can cause the wires to break or disconnect from the LED bulbs, resulting in a partial or complete loss of illumination. Another factor that can contribute to wiring problems is exposure to moisture or other environmental elements, which can corrode the wires and weaken their conductivity. Additionally, poor quality materials or manufacturing defects can also lead to wiring issues, such as loose connections or faulty wiring. It is important to address these problems promptly to ensure the safety and longevity of your LED light strings.
If you’re having trouble with the wiring on your LED light string, don’t fret! Repairing the wiring is actually quite simple with these step-by-step instructions. First, identify the damaged section of the wiring and cut it out using wire cutters. Next, strip the ends of the remaining wires and twist them together with the corresponding wires on a replacement section of wiring. Secure the twisted wires with electrical tape and test the lights to ensure they are working properly. Finally, use heat shrink tubing or more electrical tape to cover and protect the repaired section of wiring. With these easy steps, you’ll have your LED light string shining brightly once again!
Repairing LED light strings is important for several reasons. Firstly, it helps to save money as repairing them is cheaper than buying new ones. Additionally, repairing light strings reduces waste and is environmentally friendly. It also helps to maintain the aesthetic appeal of the decorations, especially during festive seasons when they are prominently displayed. Moreover, repairing LED light strings ensures the safety of users and prevents electrical hazards that may arise from faulty wiring. Therefore, it is crucial to repair LED light strings promptly to ensure they function optimally, and their lifespan is prolonged.
To ensure that your LED light strings last for future use, it’s essential to take proper care of them. Before storing them away, make sure to clean the bulbs and wires with a dry cloth to remove any dirt or debris that may have accumulated during use. Be gentle while handling the wires, as they can be fragile and may break if bent too much. It’s also recommended to store them in a cool, dry place, away from direct sunlight to prevent any damage to the plastic coating. By taking these simple steps, you can extend the life of your LED light strings and enjoy their festive glow for many more years to come.
Conclusion

In conclusion, repairing a faulty LED light string can be done quickly and easily with the right solutions. From replacing a blown fuse to identifying and replacing a faulty bulb, there are multiple ways to fix your festive decorations and bring back the holiday cheer. By following the steps outlined in this guide, you can save time and money by avoiding the need to purchase a new set of lights. Don’t let a few broken bulbs dampen your holiday spirit – use these quick and easy solutions to get your LED light string shining brightly once again.