Effortlessly Cut LED Light Strips: A StepbyStep Guide

LED light strips have become a popular lighting solution due to their versatility and efficiency. However, when it comes to customizing the length of these light strips, many people find it challenging to do so without damaging them or compromising their functionality. Fortunately, there’s a simple solution that can help you effortlessly cut LED light strips to your desired length. In this step-by-step guide, we’ll walk you through the process of cutting LED light strips without any hassle. Whether you’re looking to shorten your light strips for a DIY project or to fit them into a specific space, this guide will provide you with all the information you need. With our easy-to-follow instructions, you’ll be able to cut your LED light strips like a pro and achieve the perfect fit for your lighting needs. So, let’s get started!
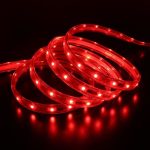
LED light strips are flexible and thin circuits of light-emitting diodes that can be easily cut and installed in a variety of settings. They are commonly used for decorative purposes in homes, businesses, and entertainment venues. LED light strips are energy efficient, long-lasting, and can emit a wide range of colors and brightness levels. They can be used to highlight architectural features, create ambiance, or add visual interest to a space. With their ease of installation and versatility, LED light strips have become a popular choice for DIY projects and professional installations alike.
Being able to cut LED light strips is essential for creating customized lighting solutions that fit your space perfectly. LED light strips are very versatile and can be used for a variety of purposes, including accent lighting, task lighting, and decorative lighting. However, they often come in fixed lengths, which can be limiting if you have a unique space or need to fit the lights around corners or curves. By cutting LED light strips to the exact length you need, you can create a seamless and professional-looking installation that enhances the ambiance of your space. Additionally, cutting LED light strips allows you to use only the amount of lighting you need, which can help you save money on energy costs. Overall, learning to cut LED light strips is an important skill for anyone looking to create a beautiful and functional lighting design.
Materials Needed
When it comes to cutting LED light strips, it is essential to have the right materials on hand to ensure a successful outcome. First and foremost, you will need a good pair of scissors or wire cutters that are sharp enough to cut through the strip’s adhesive backing and copper contacts without damaging the LEDs themselves. It is crucial to use a sharp tool to avoid any frayed edges, which can cause issues with connectivity and lighting quality. Additionally, you may want to have some sandpaper or a file on hand to smooth out any rough edges after cutting. Another critical material for cutting LED light strips is a ruler or measuring tape. Precision is key when it comes to cutting these strips, as they often come in specific lengths that need to fit precisely into the space you are working with. By measuring and marking the strip before cutting, you can ensure that you are making an accurate cut and avoid wasting any materials. Finally, it is important to have a clean and dry workspace to cut your LED light strips. Dust and debris can interfere with the adhesive backing, preventing it from sticking correctly, while moisture can cause electrical shorts or damage to the LED lights themselves. By keeping your workspace clean and dry, you can ensure that your LED light strips will work correctly and last for years to come.
If you’re planning to cut LED light strips, you’ll need a few things to make the process go smoothly. First and foremost, you’ll need a set of LED light strips that are designed to be cut. Additionally, you’ll need a pair of wire cutters, a ruler or measuring tape, a soldering iron, and some solder. It’s also a good idea to have some electrical tape on hand to help keep your connections secure. Finally, if you plan on cutting and reattaching your light strips, you’ll need some connectors to make it all work. With these materials at the ready, cutting LED light strips will be a breeze.
When it comes to cutting LED light strips, there are a few essential items that are needed to ensure a successful and effortless experience. Firstly, a pair of sharp scissors or a cutting tool such as a rotary cutter is necessary to precisely cut the strip at the desired length without causing damage to the delicate LED components. Additionally, a ruler or measuring tape will come in handy to accurately measure the length of the strip that needs to be cut. A soldering iron may also be required to reconnect the cut ends of the LED strip, which is crucial to maintaining the electrical connection and continuity of the strip. Lastly, a heat shrink tubing can be utilized to protect and secure the soldered connection. Having all of these items on hand will make the process of cutting LED light strips simple and effortless, resulting in a perfectly cut and functional strip every time.
Measuring and Marking
Measuring and marking are critical steps in cutting LED light strips. Before cutting the strip, it’s necessary to measure the length you need accurately. LED light strips come in rolls of various lengths, and you may need to cut them down to fit your project’s specific dimensions. To measure the LED strip, you can use a tape measure or ruler. Ensure that you measure the strip’s length accurately, as a mistaken measurement may result in wastage or an uneven cut. Once you have the precise measurement, mark it on the strip using a marker or pencil. Ensure that the mark is clear and visible to avoid confusion when cutting. After marking the strip, use a pair of scissors or a sharp knife to cut along the marked line. Ensure that you cut straight, without damaging any of the LED bulbs on the strip. If you are using scissors, be sure to use ones with sharp blades to avoid crushing or bending the strip. Once you have made the cut, ensure that the strip is clean and free of any debris before installing it. Measuring and marking the LED light strip accurately is crucial to ensure that it fits your project’s dimensions and that the cut is clean and even.
Before cutting your LED light strip, it is essential to measure the desired length accurately. First, find the area where you want to install the strip and measure the length using a measuring tape. Then, factor in any corners or turns that the strip may have to make, and add extra length accordingly. It is crucial to ensure that the strip fits perfectly without any gaps or overlaps. You can also mark the cutting points with a pencil or pen to make it easier to cut the strip later on. Once you have an accurate measurement, you can confidently cut the strip to the required length, knowing it will fit perfectly in its designated area.
When it comes to cutting LED light strips, accuracy is of utmost importance. To ensure that you get the perfect cut, it is essential to mark the strip precisely. You can use a ruler or measuring tape to measure the desired length and a pencil or marker to mark the cutting point. It is recommended to mark the cutting point on both sides of the strip to avoid any mistakes. Double-check the measurement and alignment before cutting to prevent any wastage or errors. Taking the time to mark the strip accurately will ensure that you get the exact length required without damaging the LED lights.
Cutting the LED Strip

Cutting the LED strip is an important step when customizing your LED lighting project. It allows you to create the perfect length needed to fit your space and achieve the desired effect. However, it is essential to follow proper techniques to prevent damaging the LED light strips. Before cutting, it is necessary to measure the exact length needed and mark it with a pencil or masking tape. Then, use sharp scissors or a sharp knife to cut along the marked line. It is crucial to cut only on the designated cutting points, which are usually indicated by copper dots or lines on the strip. Cutting in the wrong place can damage the LED lights and affect their functionality. After cutting, it is essential to seal the ends of the LED strips with solder or sealant to prevent them from unraveling or short-circuiting. Another important aspect to consider when cutting LED light strips is the voltage and current requirements of the specific strip. It is crucial to ensure that the power supply is compatible with the number of LED lights in the cut section. If the cut section has too many LED lights, it can overload the power supply and cause damage. On the other hand, if the cut section has too few LED lights, it may not receive enough power to function correctly. Therefore, it is crucial to consult the manufacturer’s specifications to determine the proper power supply required for the cut section. Overall, cutting LED light strips can be a simple and effective way to personalize your lighting project. By following proper techniques and considering the voltage and current requirements, you can achieve the desired effect while maintaining the functionality of the LED lights.
When it comes to cutting LED light strips, having the right tools is essential to ensure a clean and precise cut. The primary tool needed is a pair of sharp scissors or a sharp utility knife with a straight edge. Additionally, a ruler or tape measure can be helpful in measuring the length of the strip to be cut. It is important to ensure the cutting surface is stable and flat to prevent the strip from shifting during the cutting process. For safety, it is also recommended to wear protective gloves to avoid accidental cuts. With the right tools and precautions in place, cutting LED light strips can be a simple and effortless task.
Cutting LED light strips may seem daunting, but with the right tools and technique, it can be effortless. To begin, measure the length of the strip you want to cut and mark it with a pencil. Then, take a pair of sharp scissors or a utility knife and carefully cut along the marked line, making sure to apply enough pressure to ensure a clean cut. If you’re using scissors, be sure to use ones that are specifically designed for cutting fabric, as they tend to work best on LED light strips. Once you’ve made the cut, use a pair of wire strippers to remove the insulation from the ends of the strip, allowing you to connect it to a power source. With these step-by-step instructions, you’ll be able to effortlessly cut LED light strips to the perfect length for your needs.
Making Connections

Making connections is a crucial step in cutting LED light strips. Before you start cutting, it is important to know how you will connect the cut ends to the power source. There are different ways to connect LED light strips, including soldering, using connectors, or using adhesive tapes. Soldering is the most permanent and reliable method, but it requires some knowledge and equipment. Using connectors is a simpler method that does not require soldering, but it may not be as secure as soldering. Adhesive tapes are the easiest method, but they may not be as reliable as the other methods, especially if you plan to use the cut LED light strips for a long time. When making connections, it is important to follow the manufacturer’s instructions carefully. Each LED light strip may have different specifications, and using the wrong type of connector or tape could cause damage to the LED light strip or the power source. It is also important to make sure that the connections are secure and tight, to avoid any potential hazards such as fire or electrocution. Finally, it is a good idea to test the LED light strip after making the connections, to make sure that it is working properly and that there are no issues with the connections. By taking these steps, you can ensure that your cut LED light strips are safe, reliable, and easy to use.
Connecting a cut LED strip to a power source is a simple process that requires a few basic tools. Firstly, ensure that the power source is compatible with the LED strip’s voltage and wattage requirements. Then, strip the ends of the wires on the LED strip and the power source, exposing the copper wire. Twist the wires together and cover them with electrical tape or twist-on wire connectors. Finally, plug in the power source and test the LED strip to ensure it is functioning correctly. It is important to handle the wires and connections with care to avoid any potential electrical hazards. By following these steps, you can effortlessly connect a cut LED strip to a power source and enjoy the benefits of customizable lighting in your home or workspace.
To effortlessly cut LED light strips, one should have a basic understanding of electrical concepts. It is important to know how to handle electrical tools and equipment safely, such as wire cutters and soldering irons. Understanding the differences between positive and negative wires, as well as the importance of polarity, is crucial in ensuring that the LED light strip works correctly. Additionally, knowledge of voltage and current is important in ensuring that the LED strip is not overloaded and does not become a fire hazard. Knowing how to properly connect wires and use wire connectors is also vital in creating a secure and functioning LED light strip. Overall, having a basic understanding of electrical concepts is essential in effectively and safely cutting LED light strips.
This guide provides a step-by-step approach to cutting LED light strips effortlessly. The article emphasizes the importance of measuring the LED strip accurately before cutting it. It suggests using a cutting tool that is suitable for the job, such as a pair of scissors or a sharp knife. The guide also highlights the significance of using proper safety precautions, such as wearing gloves and eye protection, to avoid any accidents. The article also explains how to reconnect the LED strip after cutting, ensuring that the connection is secure and functioning. Overall, this guide provides a comprehensive and informative approach to cutting LED light strips with ease and precision.
When cutting LED light strips, there are some essential tips and precautions to keep in mind to ensure safety and prevent damage to the lights. Firstly, before making any cuts, always measure and mark the exact points where the strip needs to be cut. Secondly, ensure that you are using the right tools such as sharp scissors or a precision knife to get a clean cut. When cutting, take your time and cut slowly to avoid damaging the LED bulbs. Also, make sure to cut only along the designated cut lines as cutting elsewhere can damage the circuit board. Finally, remember to disconnect the power source before cutting the LED strip to avoid the risk of electrocution. By following these precautions, you can easily and safely cut your LED light strips to your desired length.
Being able to cut LED light strips is an essential skill for anyone who wants to customize their lighting setup. Not only does it allow you to create unique designs and patterns, but it also helps to save energy and reduce waste. By cutting LED light strips to the desired length, you can ensure that you are only using the amount of light that you need, which can result in lower energy bills and a smaller carbon footprint. Additionally, cutting LED light strips makes it easier to install them in a variety of spaces and configurations, making it a versatile and practical solution for any lighting project. Overall, the importance of being able to cut LED light strips cannot be overstated, and it is a valuable skill for anyone who wants to take their lighting game to the next level.
Conclusion
In conclusion, cutting LED light strips can seem like a daunting task, but with the right tools and techniques, it can be done effortlessly. By following the step-by-step guide provided, anyone can customize their LED light strips to fit their desired length and achieve the perfect lighting ambiance for their space. It is important to remember to take the proper safety precautions and to use sharp and precise tools to ensure a clean cut. With a little patience and practice, cutting LED light strips can be a fun and easy DIY project that can enhance the look and feel of any room. So, go ahead and give it a try, and bask in the glow of your perfectly cut LED light strips.