Upgrade Your Lighting: Quick Guide on How to Replace Fluorescent Light with LED
Lighting is an essential aspect of modern-day living, with a significant impact on our mood, productivity, and overall well-being. As technology advances, so does the lighting industry, with the introduction of more efficient and cost-effective lighting options. One such option is LED lighting, which has become increasingly popular due to its energy-saving capabilities and long lifespan. In this quick guide, we will explore how to replace fluorescent lights with LED and upgrade your lighting experience. Fluorescent lighting has been a go-to option for many homes and businesses for decades, but it has its downsides. Fluorescent lights are known to flicker, produce a harsh white light, and contain hazardous chemicals such as mercury, making them difficult to dispose of. LED lighting, on the other hand, offers a range of benefits, including lower energy consumption, longer lifespan, and a variety of color options. By upgrading your lighting to LED, you can reduce your energy bills and create a more comfortable and sustainable environment. In the following sections, we will provide a step-by-step guide on how to replace fluorescent lights with LED, making the transition easy and hassle-free.
LED lights have several benefits over fluorescent lights. Firstly, they are more energy-efficient and can save up to 80% energy compared to fluorescent lights. Secondly, LED lights have a longer lifespan, lasting up to 25 times longer than fluorescent lights. This means fewer replacements and less maintenance costs. Additionally, LED lights are more environmentally friendly as they do not contain toxic materials like mercury, which is found in fluorescent lights. LED lights also emit less heat, making them safer to use and reducing the load on air conditioning systems. Finally, LED lights offer better lighting quality, with brighter and more consistent lighting that can enhance productivity and reduce eye strain.
Upgrading your lighting system from fluorescent to LED might seem like a daunting task, but it is an investment that will ultimately save you time and money. The first step is to assess the size and number of fluorescent fixtures you have and determine the correct LED replacement. Next, turn off the power to the fixtures and remove the fluorescent bulbs and ballast. Connect the LED driver to the fixture, and install the LED bulbs. Lastly, turn on the power and enjoy the improved lighting quality and energy efficiency of your new LED lights. With a little bit of planning and effort, the process of replacing fluorescent lights with LED can be simple and rewarding.
Gather Materials

When it comes to upgrading your lighting from fluorescent to LED, the first step is to gather all the necessary materials. This includes the LED light fixtures, LED bulbs, wire cutters, wire strippers, pliers, and a ladder. It is important to ensure that all the materials are compatible with each other and the electrical system in your building. You may also need to purchase additional materials such as electrical tape, wire nuts, and mounting brackets depending on the installation requirements. It is important to note that LED bulbs are available in different sizes and shapes, so it is essential to choose the right bulb for your fixture. Additionally, LED bulbs have different color temperatures and brightness levels, so it is important to select the right one that suits your needs. Once you have gathered all the necessary materials, you are ready to proceed with the installation process.
To replace fluorescent lights with LED lights, you will need a few tools and materials. Firstly, you will need a voltage tester to ensure the power is off before you start working. Next, you will need a screwdriver to remove the screws holding the fluorescent fixture in place. A wire stripper and wire nuts are also necessary to connect the wires from the LED fixture to the existing wiring. It’s essential to have LED bulbs that are compatible with your fixture and have the same base as the fluorescent bulbs you are replacing. Additionally, a ladder or step stool will be needed to reach the fixture. Lastly, safety glasses and gloves are recommended to protect your eyes and hands. With these tools and materials, you can successfully replace your fluorescent lights with LED lights, saving energy and money in the process.
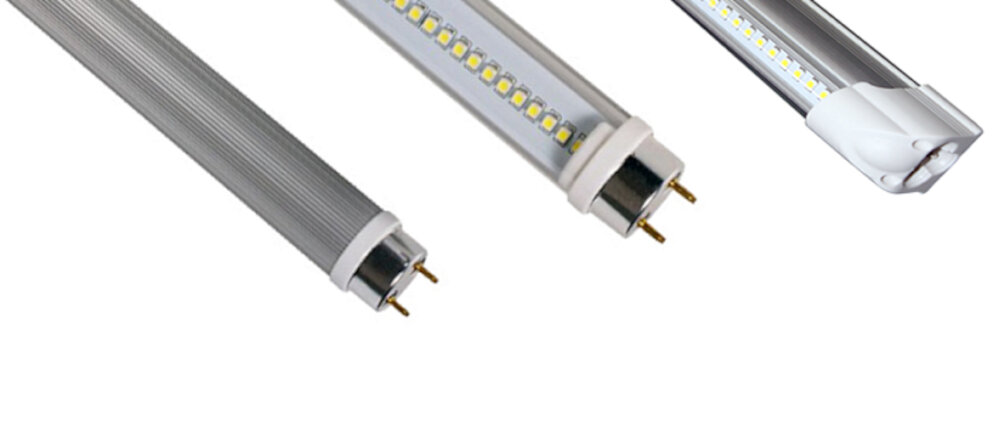
Fluorescent lights have been the go-to for office and home lighting for decades, but with the advent of LED technology, it’s time to make the switch. LED lights are more energy-efficient, last longer, and provide better illumination. To replace fluorescent lights with LED, you’ll need a few supplies. The LED light itself is the most important item, as it will provide the illumination you need. You’ll also need a ballast bypass kit, which will allow you to bypass the existing ballast and power the LED directly. Additionally, you’ll need wire nuts, a wire stripper, and pliers to make the electrical connections. With these supplies, you can upgrade your lighting to LED quickly and easily.
Turn Off Power and Remove Old Fixture
The first step in upgrading your lighting from fluorescent to LED is to turn off the power and remove the old fixture. This is an important safety precaution that should not be overlooked. Before starting any electrical work, it’s important to turn off the power to the area where you will be working. This can be done by flipping the circuit breaker or removing the fuse that controls the power to the fixture. Once the power is off, use a voltage tester to confirm that there is no electrical current flowing through the wires. Safety should always be the top priority when working with electricity, so be sure to follow all safety guidelines and wear protective gear, such as gloves and goggles. After the power is off and you’ve confirmed that the wires are safe to handle, it’s time to remove the old fixture. This may require removing screws or clips that hold the fixture in place, as well as disconnecting any wires that are attached to it. Be sure to take note of how the wires are connected so that you can connect the new fixture correctly. Once the old fixture is removed, inspect the wiring to make sure that it’s in good condition and that there are no frayed or damaged wires. If any issues are found, they should be addressed before installing the new LED fixture. Removing the old fixture and inspecting the wiring is an essential step in the process of upgrading to LED lighting and will ensure that the installation goes smoothly.
Before starting any work, it’s essential to turn off the power supply to the fluorescent light fixture. Firstly, locate the circuit breaker box and switch off the corresponding circuit breaker. It’s highly recommended to check whether the power supply is off or not by using a non-contact voltage tester. Now, remove the fluorescent light tube and the cover or diffuser if there is any. Next, remove the mounting screws, nuts, or bolts that hold the fixture in place. Carefully detach the fixture from the ceiling or wall and disconnect the wiring. It’s crucial to make sure that no wires are touching or exposed. Finally, remove the mounting plate and discard the old fixture safely. Make sure to follow proper disposal guidelines and avoid throwing it in the regular garbage.
It is essential to handle and dispose of fluorescent bulbs correctly to prevent environmental pollution and health hazards. When handling these bulbs, wear gloves to avoid direct contact and breakage. If a bulb breaks, carefully sweep up the pieces using a broom or vacuum cleaner and place them in a sealed container before disposing of them. Fluorescent bulbs contain trace amounts of mercury, which is harmful to human health and the environment. Therefore, it is crucial to dispose of them correctly. Check with your local waste management facility for guidelines on how to dispose of these bulbs safely. Many hardware stores also offer recycling programs for fluorescent bulbs. By following these tips, you can upgrade your lighting while still being environmentally responsible.
Install LED Light Fixture
Upgrading your lighting to LED is a great way to save energy and reduce your electricity bill. One of the first steps in making the switch is to install LED light fixtures. The process is fairly straightforward and can be done by anyone with basic electrical knowledge. The first step is to turn off the power to the existing light fixture by flipping the circuit breaker or removing the fuse. Then, remove the old fixture by unscrewing the screws or bolts that hold it in place. Be sure to save any screws, bolts, or brackets that you may need to attach the new fixture. Once the old fixture is removed, you can begin installing the new LED fixture. Begin by attaching any brackets or screws that are needed to hold the new fixture in place. Then, connect the wires from the new fixture to the wires in the electrical box. This is typically done by matching the colors of the wires (black to black, white to white, etc.) and twisting them together. Finally, screw the new fixture into place, turn the power back on, and enjoy your new, energy-efficient lighting. With a little bit of time and effort, you can upgrade your lighting and start saving money on your energy bill.
Installing an LED light fixture to replace a fluorescent light can be an easy and cost-effective way to upgrade your lighting. To begin, turn off the power source to the existing fixture by flipping the circuit breaker. Remove the fluorescent light fixture and disconnect the wiring by unscrewing the wire nuts. Next, attach the mounting bracket of the LED fixture to the ceiling using screws and anchors. Connect the LED fixture wiring to the wiring from the ceiling by twisting the wires together and securing them with wire nuts. Finally, attach the LED light fixture to the mounting bracket and turn the circuit breaker back on to test the new lighting. With these simple steps, you can enjoy the energy efficiency and aesthetic benefits of an LED light fixture in your home or office.
When replacing fluorescent lights with LED, it is crucial to ensure that the fixture is secure and properly aligned. First, turn off the power supply and remove the old fluorescent bulbs and ballast. Then, carefully adjust the LED light’s mounting bracket to fit the existing fixture’s screws and holes. Use a level to ensure that the fixture is aligned correctly and tighten the screws to secure it in place. Double-check that the wiring is correctly connected before turning the power back on. Finally, test the light to make sure it is working correctly and providing adequate illumination. Taking the time to ensure that the fixture is secure and correctly aligned will help prevent any mishaps and ensure a successful LED lighting upgrade.
Turn On Power and Test the Light
The first step in upgrading your lighting is to turn on the power and test the light. Before beginning the replacement process, it is important to ensure that the power to the existing fluorescent light fixture is turned off. This can be done by flipping the switch associated with the fixture or by turning off the circuit breaker that powers the fixture. Once the power is turned off, you can remove the fluorescent tubes and ballast from the fixture. It is important to handle the tubes carefully as they contain small amounts of mercury, which can be harmful if released into the environment. Once the fluorescent tubes and ballast have been removed, you can begin testing the LED light fixture. Install the LED tubes and ballast into the fixture and turn the power back on. If the light turns on immediately and functions properly, then the installation is complete. However, if the light does not turn on, you may need to troubleshoot the issue by checking the wiring connections and ensuring that the ballast is compatible with the LED tubes. By taking the time to properly test the LED light fixture, you can ensure that it is functioning properly and will provide energy-efficient lighting for years to come.
Before turning on the power, ensure that you have correctly installed the LED light fixture to the existing wiring. First, turn off the power supply from the circuit breaker to prevent any electrical shock. Once done, connect the wires from the LED light fixture to the corresponding wires from the electrical box. Then, secure the fixture to the ceiling or wall using screws. After everything is in place, turn on the power supply from the circuit breaker and switch on the LED light fixture. If everything is properly connected, the LED light should turn on immediately. Test the brightness and color of the LED light by adjusting the dimmer switch, if available. If everything works as expected, then congratulations, you have successfully upgraded your lighting!
When upgrading your lighting from fluorescent to LED, there may be some issues that arise during the installation process. To troubleshoot these issues, firstly, ensure that the LED lights are compatible with the fixtures you are replacing. Secondly, check the wiring and connections to ensure they are secure and correctly placed. Thirdly, make sure the power supply is adequate to support the LED lights. If the issue persists, consider consulting a professional or contacting the manufacturer for support. Keeping these tips in mind will help ensure a smooth and successful transition to LED lighting.
LED lights have numerous benefits over fluorescent lights, including longer lifespan, energy efficiency, and better color rendering. Moreover, LED lights emit less heat, contain no hazardous materials, and are more durable. To replace fluorescent lights with LED lights, you first need to identify the type of fluorescent fixture you have, measure its dimensions, and purchase compatible LED tubes or fixtures. Next, turn off the power, remove the fluorescent tubes, and remove or bypass the ballast. Then, install the new LED tubes or fixtures, connect the wiring, and turn on the power to enjoy the improved lighting quality and cost savings. By following these steps, you can upgrade your lighting easily and quickly.
Upgrading your lighting system can have a significant impact on both your energy consumption and your wallet. By swapping out your old fluorescent lights with LED lights, you can save up to 75% on your lighting bill. Not only that, but LED lights have a much longer lifespan than traditional fluorescent bulbs, meaning you’ll save money in the long run by not having to replace them as frequently. Additionally, LED lights are more energy-efficient, producing less heat and reducing your overall energy consumption. By upgrading your lighting system, you’ll not only be saving money, but you’ll also be doing your part to reduce your carbon footprint and help the environment. So why wait? Upgrade your lighting today and start reaping the benefits!
Conclusion
In conclusion, replacing fluorescent lights with LED lights is an upgrade that can enhance the look and feel of any space. It is a quick and easy process that can save energy, reduce costs, and provide better quality lighting. With the benefits of LED lights, such as longer lifespan, low maintenance, and reduced carbon footprint, it is a smart choice for any homeowner or business owner looking to make a positive impact on the environment and their budget. So why not upgrade your lighting today and enjoy the many advantages that LED lights have to offer!
Related posts:
 Upgrade Your Lighting: A StepbyStep Guide on How to Replace a Fluorescent Light Fixture with LED
 Upgrade Your Lighting: Learn How to Easily Replace Fluorescent Light Bulbs with EnergyEfficient LED Bulbs
 Upgrade Your Lighting: How to Easily Change Fluorescent Lights to EnergyEfficient LEDs
 Upgrade Your Lighting: How to Easily Replace an Incandescent Bulb with LED for Energy Efficiency