Quick Fix: How to Repair a Torn LED Light Strip in Minutes

LED light strips are becoming increasingly popular in homes, offices and public spaces. They are energy-efficient, long-lasting and add a stylish touch to any room. However, just like any other electrical appliance, LED light strips can malfunction and become damaged over time. One of the most common issues is a torn LED light strip. This can happen due to wear and tear, accidental damage or improper installation. But the good news is that repairing a torn LED light strip is a quick and easy process that can be done in minutes with the right tools and techniques. In this article, we will guide you through the steps to repair a torn LED light strip. You don’t need to have any experience in electrical repair or be an expert in LED lighting to fix the problem. We will explain the materials you need, the tools required and the steps to follow. We will also discuss some tips and tricks to prevent the problem from happening again in the future. So, if you have a torn LED light strip that needs fixing, don’t worry! With our quick fix guide, you’ll be able to get your LED lights back to their full glory in no time.
LED light strips are a popular choice for lighting up various spaces, from homes to commercial buildings. However, they are not immune to wear and tear, and can easily get torn or damaged, which can be a frustrating problem to deal with. This can be caused by a variety of reasons such as accidents, regular usage, or exposure to the elements. A torn LED light strip can lead to uneven lighting, flickering, or complete failure of the strip. Fortunately, repairing a torn LED light strip is a quick and easy task that can be done in minutes with some basic tools and materials.
LED light strips have become increasingly popular in recent years due to their versatility and energy efficiency. However, these strips are prone to wear and tear, and one common issue is a torn LED light strip. It is important to fix a torn LED light strip as soon as possible to avoid further damage and potential safety hazards. A torn strip can cause the LED lights to malfunction, leading to uneven lighting or complete failure of the strip. Additionally, exposed wires can pose a risk of electrical shock or fire. By repairing a torn LED light strip, you can extend the life of your lighting investment and ensure that your home or workspace remains safe and well-lit. With a few simple tools and techniques, it is possible to fix a torn LED light strip in just a matter of minutes.
Materials Needed

In order to repair a torn LED light strip, you will need a few materials to get started. First and foremost, you will need a soldering iron and some solder. This will allow you to reattach any disconnected wires that may have been causing the issue. Additionally, you will need some wire strippers to remove any damaged insulation and expose the wire underneath. This will make it easier to reattach the wires to the strip. Finally, you may want to have some heat shrink tubing on hand. This can help to protect the wires and provide additional support to the repair job. It is important to note that while these materials are necessary for repairing a torn LED light strip, it is also important to have some basic knowledge of electrical wiring and soldering techniques. If you are not confident in your ability to perform these tasks safely and effectively, it may be best to seek the assistance of a professional. However, with the right materials and a bit of know-how, repairing a torn LED light strip can be a quick and easy process that can save you time and money in the long run.
When it comes to repairing a torn LED light strip, the first step is to gather all the necessary materials. You will need a soldering iron, soldering wire, wire cutters, heat shrink tubing, and a heat gun. Additionally, you may require a multimeter to check for any electrical problems, a knife or scissors to cut the heat shrink tubing and wire, and a screwdriver to open the LED light strip if needed. It’s important to have all the necessary materials before starting the repair process to ensure that the repair is done quickly and effectively. With these materials, repairing a torn LED light strip can be done in just a few minutes.
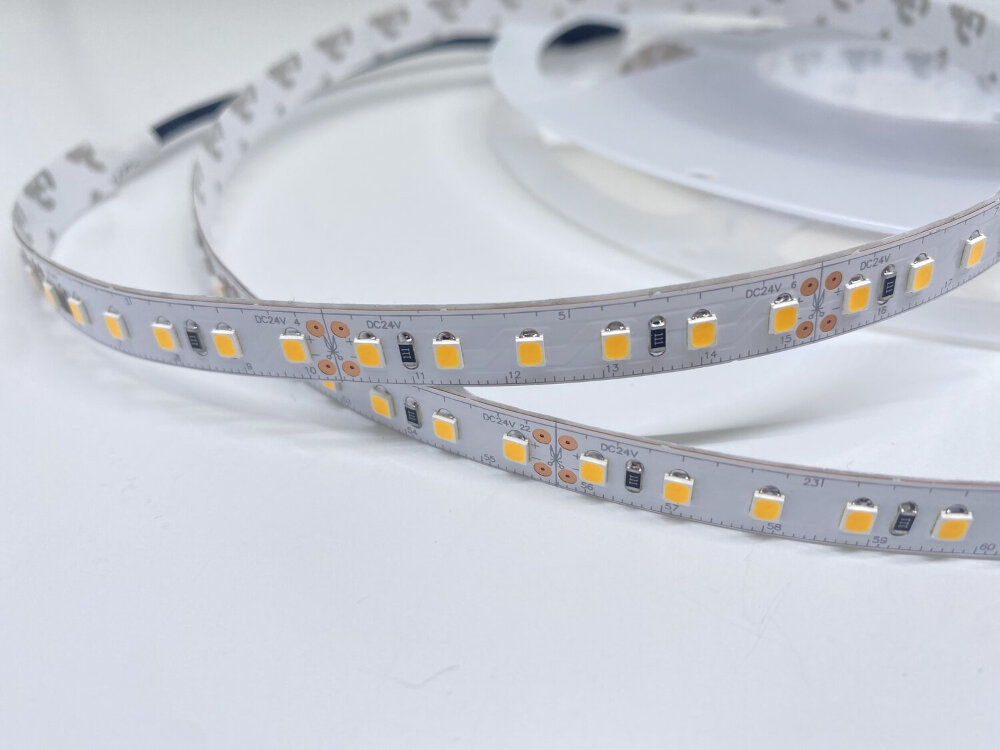
The LED light strip is composed of several materials that work together to create a bright and colorful light. The PCB board is the backbone of the strip, providing electrical connections and support for the LED lights. The LED chips themselves are made of semiconductor materials that emit light when an electrical current is applied. The adhesive backing holds the strip in place and allows for easy installation. The silicone coating protects the strip from water and other environmental factors. Finally, the wires provide power to the strip and allow it to be connected to a power source. Understanding these materials is essential for repairing a torn LED light strip quickly and effectively.
Preparation
When it comes to repairing a torn LED light strip, preparation is key. The first step is to gather all the necessary tools and materials. This may include a soldering iron, solder, wire strippers, electrical tape, and a replacement LED strip. It’s important to ensure that the replacement strip is the same as the one that is torn, as using a different strip may result in compatibility issues. Once all the materials are gathered, it’s important to create a clean and safe workspace. This may involve clearing the area of any clutter, ensuring there are no flammable materials nearby, and setting up a heat-resistant surface for the soldering iron. It’s also recommended to wear safety goggles and gloves to protect against any potential hazards. By taking the time to prepare properly, the repair process will be smoother and safer, allowing for a quick fix in just minutes.
Before starting the repair process of a torn LED light strip, there are a few crucial steps that you need to follow to ensure your safety and the effectiveness of the repair. Firstly, you need to switch off the power supply to the LED light strip to avoid electric shock or damage to the strip. Secondly, carefully examine the damaged area to determine the extent of the tear and any other potential problems that may affect the repair process. Thirdly, gather all the necessary tools and materials such as soldering iron, wire cutters, and shrink tubing to make the repair process smooth and efficient. Lastly, it’s essential to have a clear understanding of the repair procedure by reading the manufacturer’s manual or following a reliable online guide to avoid any errors or mistakes. By following these steps, you can increase your chances of a successful and long-lasting repair.
When repairing a torn LED light strip, it’s important to keep safety tips in mind. First, always turn off the power source before attempting any repairs. This will prevent electrical shock and other accidents. Second, wear protective gear such as gloves and safety glasses to prevent injury from broken glass or other sharp objects. Third, make sure to work in a well-ventilated area to avoid inhaling any toxic fumes that may be released during the repair process. Finally, be sure to follow any manufacturer instructions or guidelines to ensure a safe and successful repair. By keeping these safety tips in mind, you can successfully repair your LED light strip without risking your health and well-being.
Repairing the Torn LED Light Strip

LED light strips are becoming increasingly popular due to their flexibility, energy efficiency, and the ability to produce a variety of colors. However, despite their durability, they can still get damaged, especially if they are not installed correctly. One of the most common issues with LED light strips is tearing. Torn LED light strips not only look unattractive but can also affect their performance. Fortunately, repairing a torn LED light strip is a simple and quick process that can be done in minutes. To repair a torn LED light strip, the first step is to identify the location of the tear. Once you have located the tear, you will need to clean the area around it with a damp cloth to remove any dirt or debris. Next, you will need to apply a small amount of conductive adhesive to the torn area. Conductive adhesive is specially designed to repair electrical circuits and is perfect for repairing torn LED light strips. Once the adhesive is applied, wait for it to dry completely before turning on the LED light strip. If the repair is successful, the LED light strip should work as before, and the tear should no longer be visible.
If you’re dealing with a torn LED light strip, don’t worry, as it’s a relatively simple repair process that can be done in just a few minutes. First, gather your tools, including a soldering iron, wire cutters, and heat shrink tubing. Next, cut off the damaged section of the LED strip and strip back the wires. Then, use the soldering iron to solder on a new wire to connect the two sections. Finally, slide the heat shrink tubing over the repaired area and heat it up with a heat gun to seal it. With these easy steps, your LED light strip will be back to working condition in no time.
When it comes to repairing a torn LED light strip, there are a few helpful tips and tricks to keep in mind. Firstly, it’s important to identify the cause of the tear, whether it be from accidental damage or wear and tear over time. From there, you can determine the best course of action, such as using electrical tape or soldering the broken connection. It’s also crucial to work in a well-lit and clean workspace, with the proper tools and materials on hand. Additionally, taking the time to properly secure the repaired area with adhesive or heat shrink tubing can help prevent future damage. With these tips and tricks in mind, repairing a torn LED light strip can be a quick and simple task.
Testing and Finishing Touches
After repairing the torn LED light strip, it is necessary to test the lights to ensure they are working correctly. Testing the LED strip is a significant step to ensure that the repair has been successful. To test the LED strip, plug it in and turn it on. Check to see if all the lights light up and if there are any flickers. If there are no flickers and all the lights are working, then the repair has been successful. If not, it is necessary to check the connections and ensure that they are secure. Testing the LED strip is essential to ensure that it is safe to use and ready for installation. Once the LED strip has been repaired and tested, it is time to add the finishing touches. The finishing touch is an essential step in ensuring that the LED strip looks professional and is ready for use. One way to add the finishing touches is to use a heat shrink tube to cover the repaired area. The heat shrink tube not only protects the repaired area but also provides a neat and tidy finish. Another way to add the finishing touches is to use a hot glue gun to secure the connections. The hot glue gun ensures that the connections are secure and also provides a neat finish. Adding the finishing touches is an essential step in ensuring that the LED strip is safe to use, looks professional, and is ready for installation.
After repairing a torn LED light strip, it is imperative to test it to ensure that it is working properly. To test the repaired LED light strip, plug it into a power source and turn it on. Observe the entire strip carefully to see if all the LED lights are lit up and functioning correctly. If any section of the strip is still not working, unplug it, and check for any loose connections or damaged wiring. Also, make sure that the power source is supplying enough voltage to power the entire strip. Once you are satisfied that the LED light strip is in good condition, you can mount it back in its original location and enjoy the bright and vibrant lighting it provides.
After repairing a torn LED light strip, it is crucial to add some final touches to ensure the best results. Firstly, it is essential to clean the repaired area thoroughly to remove any dirt or debris that may have accumulated during the repair process. Secondly, it is advisable to test the repaired strip to ensure that all connections are secure and the light is functioning correctly. Finally, it is recommended to apply a protective coating, such as silicone or hot glue, over the repaired area to prevent future damage and ensure the longevity of the LED light strip. By following these final touches, you can ensure that your repaired LED light strip will function correctly and provide optimal lighting for your needs.
The repair process for a torn LED light strip can be completed in just a few minutes with the right tools and techniques. First, locate the tear in the light strip and carefully remove the damaged section. Next, use a soldering iron to connect a new strip of LEDs to the existing wiring, making sure to match the polarity correctly. Once the connection is secure, use heat shrink tubing to cover the joint and protect it from damage. Finally, test the repaired light strip to ensure that it is working properly. With a little patience and attention to detail, anyone can repair a torn LED light strip and avoid the expense of replacement.
In conclusion, fixing a torn LED light strip is crucial for maintaining the aesthetic appeal and functionality of your lighting system. A torn LED light strip not only looks unsightly but also poses potential electrical hazards that can cause damage to your property or harm to individuals. Furthermore, repairing a torn LED light strip is a cost-effective solution compared to replacing the entire lighting system. With the simple steps outlined in this guide, you can fix your torn LED light strip in minutes and enjoy the benefits of a fully functional and visually appealing lighting system. Don’t let a torn LED light strip dim your space’s brightness; take action and repair it today!
Conclusion
In conclusion, repairing a torn LED light strip can be a simple and quick fix that only takes a few minutes. By following the steps outlined in this guide, you can easily repair your light strip without having to spend money on a replacement. It is important to note that prevention is always better than cure, so taking care of your LED light strip and avoiding any physical damage is crucial. However, if damage does occur, don’t panic and try the quick fix method before considering a replacement. With a little bit of patience and effort, you can have your LED light strip back in working order in no time.