DIY Guide: Connecting LED Light Strips to Battery in 5 Easy Steps
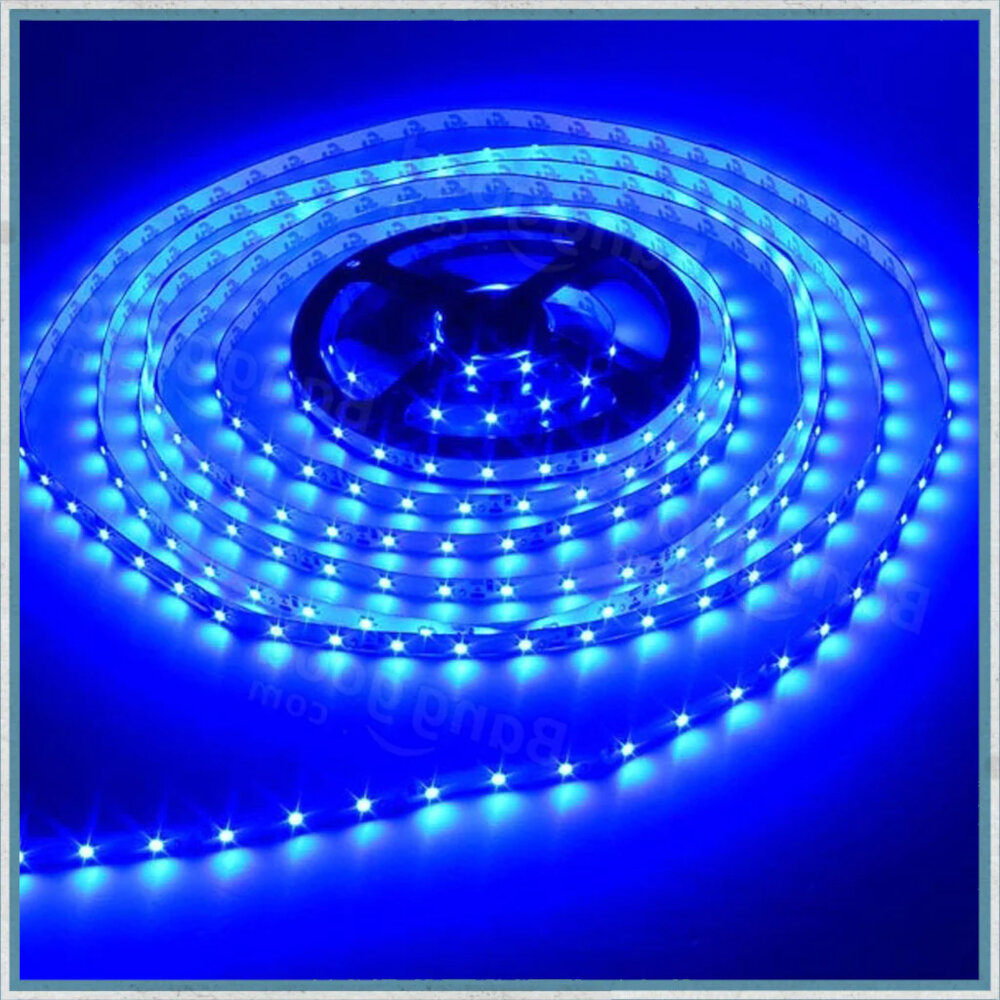
LED light strips have become a popular addition to many homes and businesses due to their versatility and energy efficiency. These strips can provide ambient lighting or create a mood with various colors, making them ideal for accenting different areas. One of the challenges of using LED strips is finding a reliable power source. While most strips come with a plug-in adapter, it’s not always convenient to have an outlet nearby. Connecting the LED light strips to a battery can be a great solution, especially for outdoor areas or for creating portable lighting. This DIY guide will provide five easy steps to connect LED light strips to a battery. The process is relatively simple and requires only a few basic tools, making it accessible to even those with minimal electrical experience. Whether you’re looking to create a cozy atmosphere in your backyard or add some ambiance to your camping trip, this guide will help you get started. With these steps, you’ll be able to light up your space in no time and enjoy the benefits of LED lighting with the convenience of a battery-powered setup.
Materials Needed

When it comes to connecting LED light strips to a battery, it’s important to have all the necessary materials on hand to ensure a successful DIY project. First and foremost, you’ll need LED light strips, which come in a variety of colors and lengths. These can be purchased online or at your local hardware store. Additionally, you’ll need a battery pack to power the LED lights. Make sure to choose a battery pack that is compatible with your LED light strips and has enough voltage to power them. It’s also important to have wire cutters and strippers on hand to properly connect the wires from the LED light strips to the battery pack. Finally, you’ll need electrical tape to secure the wires and prevent any potential electrical hazards. In addition to these essential materials, there are a few optional materials that can make the process even easier. For example, a soldering iron and solder can be used to connect the wires more securely and permanently. A multimeter can also be helpful in ensuring that the LED light strips are receiving the proper voltage from the battery pack. Finally, a mounting tape or adhesive can be used to attach the LED light strips to a surface for a more permanent installation. By having all of these materials on hand and ready to use, you’ll be well-equipped to connect LED light strips to a battery in just five easy steps.
Step 1: Determine the Voltage and Current of LED Light Strips
When it comes to connecting LED light strips to a battery, the first step is to determine the voltage and current of the strips. This is crucial because LED light strips come in a variety of voltages and currents, and using the wrong voltage or current can damage the LED lights. The voltage of LED light strips can range from 5 volts to 24 volts, and the current can range from 0.2 amps to 1.5 amps. To determine the voltage and current of LED light strips, it is important to check the manufacturer’s specifications or use a multimeter. A multimeter is a tool that can be used to measure the voltage and current of electronic devices. Once the voltage and current of the LED light strips are determined, it is important to make sure the battery being used matches the voltage and current requirements of the LED light strips. In addition to determining the voltage and current of the LED light strips, it is also important to consider the power source being used. LED light strips can be powered by either a DC power supply or a battery. If using a battery, it is important to choose a battery with the correct voltage and current rating, as well as the appropriate type of battery. Different types of batteries, such as alkaline, lithium-ion, and nickel-cadmium, have different voltage and current ratings, and using the wrong type of battery can also damage the LED light strips. It is important to choose a battery with enough capacity to power the LED light strips for the desired amount of time, as well as a battery with the appropriate connectors to connect to the LED light strips. By taking the time to determine the voltage and current of the LED light strips and choosing the appropriate power source, you can ensure that your LED light strips will function properly and last for a long time.
Step 2: Select Battery and Connect Wires

Step 2 of the DIY guide for connecting LED light strips to battery is selecting the appropriate battery and connecting wires. The battery selection process is critical as it determines the LED light’s power output and longevity. The most common battery used for LED light strips is a 12V DC battery that can power strips up to 16.4 feet long. However, if you’re planning to install longer strips, you may need a higher voltage battery or multiple batteries connected in parallel or series. It is also essential to consider the battery’s capacity and ensure it can provide enough power to sustain the LED light strip’s output for an extended period. Once you have selected the appropriate battery, the next step is to connect the wires. This step requires care and precision to ensure that the wires are correctly connected to the battery terminals and the LED light strip. First, connect the positive wire of the LED light strip to the positive terminal of the battery and the negative wire to the negative terminal. Ensure that the wires are securely connected and that there is no risk of short-circuiting. You can use electrical tape or wire connectors to secure the wires in place. It is also essential to test the LED light strip’s functionality before proceeding to the next step to ensure that everything is working correctly.
Step 3: Test the Connection
Step 3 of the DIY guide for connecting LED light strips to a battery is a crucial one, as it ensures that the connection is successful and safe. Testing the connection involves checking the polarity of the battery, the voltage output, and the brightness of the LED light strips. It is essential to follow the steps carefully and use a multimeter to avoid any accidents, such as a short circuit or overloading the battery. Testing the connection also allows you to make any necessary adjustments before mounting the LED light strips permanently. A successful test result will indicate that the LED light strips are receiving the correct amount of power and that the battery is not overloaded. It will also ensure that the polarity of the battery is correct, which is crucial to prevent any damage to the LED light strips. Moreover, testing the connection can be a satisfying moment, as you witness the LED light strips illuminate for the first time. In case of any issues, you can troubleshoot and rectify the problem before mounting the LED light strips. Therefore, testing the connection is a vital step in the DIY guide, as it ensures a safe and successful connection of LED light strips to a battery.
Step 4: Secure the Connection
Once you have successfully connected the LED light strips to the battery, it is important to secure the connection to prevent any accidental disconnections or short circuits. To do so, you can use electrical tape or heat shrink tubing to cover the exposed wires and connections. This will not only provide extra protection but also a neat and clean finish to your project. Additionally, it is recommended to place the battery and the connection in a safe and secure location away from any potential hazards or moisture. Furthermore, it is important to keep in mind that securing the connection is not only about preventing accidents but also about ensuring the longevity of your project. Any loose connections or exposed wires can lead to a decrease in the overall performance and lifespan of the LED light strips. Therefore, taking the extra step of securing the connection can save you time and money in the long run by avoiding any potential damages or replacements. By following these simple steps, you can enjoy your DIY LED light strip project with ease and peace of mind.
Step 5: Enjoy Your LED Light Strips
Once you have successfully connected your LED light strips to the battery, it’s time to sit back and enjoy the stunning visual effect. These light strips have the ability to transform any space and create a unique ambiance that is both stylish and relaxing. Whether you are using them for accent lighting or to highlight a feature in your home, LED light strips are a versatile and cost-effective solution that can be used in a wide range of applications. One of the great things about LED light strips is that they are incredibly easy to use and require very little maintenance. Once you have installed them, you can forget about them and enjoy the beautiful lighting effect that they provide. Whether you are looking to create a warm and inviting atmosphere in your living room or add some color to your outdoor space, LED light strips are the perfect solution. So go ahead, sit back, relax and enjoy the stunning visual effect of your new LED light strips.
Conclusion

In conclusion, connecting LED light strips to a battery is a simple and easy task that can be accomplished by anyone with basic knowledge of electronic circuits. By following the 5 easy steps outlined in this DIY guide, you can create your own custom lighting designs and bring your ideas to life. Whether you want to add some ambiance to your home, create a unique display for a special event, or simply experiment with electronics, connecting LED light strips to a battery is a fun and rewarding experience. With a little creativity and some basic materials, you can create stunning lighting effects and impress your friends and family with your DIY skills. So don’t hesitate to try it out and see what amazing creations you can come up with!