ATV LED Light Bar Installation Made Easy: A StepbyStep Guide
When it comes to off-road adventures, having sufficient lighting is crucial, especially during nighttime excursions. One of the best ways to enhance your ATV’s lighting capabilities is to install a high-quality LED light bar. Not only does it provide better visibility, but it also adds an aesthetic appeal to your vehicle. However, the installation process may seem daunting for beginners. Fortunately, with the right tools, knowledge, and guidance, you can easily install an ATV LED light bar in a few straightforward steps. This step-by-step guide will walk you through the installation process, from gathering the necessary equipment to mounting the light bar onto your ATV. Whether you’re a seasoned off-roader or a novice enthusiast, this guide will provide you with a comprehensive understanding of ATV LED light bar installation, making it easy for you to upgrade your vehicle’s lighting system. So, let’s dive into the world of off-road lighting and discover how you can take your ATV experience to the next level.
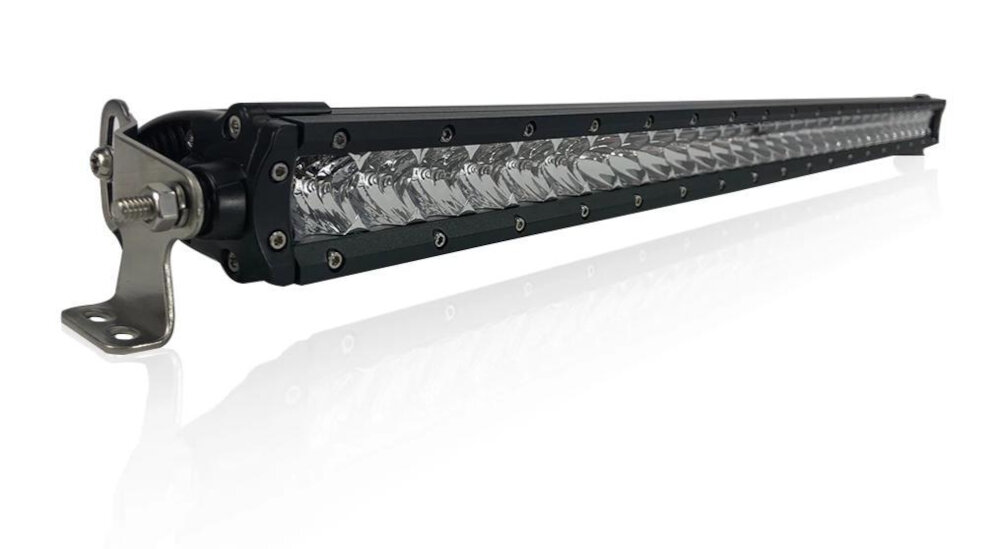
ATV LED light bars are a popular addition to off-road vehicles, providing powerful and efficient lighting that can make navigating rough terrain much easier. These light bars are made with high-quality LED bulbs that provide bright, clear illumination, even in low light conditions. They are designed to be durable and weather-resistant, making them a great option for off-road use. Some of the benefits of using ATV LED light bars include improved visibility, increased safety, and a more enjoyable off-road experience overall. Whether you’re out for a night ride or just need some extra light to see the trail ahead, an ATV LED light bar can be a valuable addition to your vehicle.
Proper installation of an ATV LED light bar is essential for both optimal performance and safety. A poorly installed light bar may not function as intended, which can be frustrating and dangerous during off-road adventures. Additionally, an incorrectly installed light bar can pose a safety risk by falling off during operation, potentially causing injury or damage. A thorough and proper installation ensures that the light bar is securely attached and positioned correctly, providing the best possible illumination and minimizing the risk of accidents. By following a step-by-step guide and taking the time to install the light bar correctly, ATV enthusiasts can enjoy the benefits of improved visibility and safety during their outdoor adventures.
Gather the Necessary Tools and Materials
The first step in installing an ATV LED light bar is to gather all the necessary tools and materials. You will need a few basic hand tools such as a socket set, screwdrivers, pliers, and wire cutters. It is also essential to have a wiring harness kit specifically designed for ATV LED light bar installation. This kit should include a relay, fuse, switch, and wiring connectors. Additionally, you will require a drill and drill bits, mounting hardware, and a mounting bracket for the light bar. Before starting the installation process, it is vital to ensure that you have all the necessary tools and materials. Missing a tool or material can result in delays and incomplete installations. It is also necessary to ensure that your tools and materials are of high quality to ensure that the installation is done correctly and lasts a long time. Taking the necessary time to gather all the required tools and materials before starting the installation process will make the process much more manageable and avoid potential complications.
Before starting the ATV LED light bar installation, it is important to have all the necessary tools and materials. The list of required tools includes a socket set, wire crimpers, wire strippers, electrical tape, drill, drill bits, and a wrench. The materials required for the installation include the LED light bar, a wiring harness, a relay, a fuse, and mounting brackets. It is crucial to ensure that all the tools and materials are of good quality and appropriate for the job. Having all the necessary tools and materials before starting the installation will ensure a smooth and efficient process.
When selecting an LED light bar for your ATV, it’s important to consider both the size and type of the bar. First, determine the size of the bar that will fit on your vehicle without obstructing your view or causing damage. The most common sizes for ATV light bars are between 10 and 30 inches. Next, consider the type of LED light bar that will best suit your needs. Floodlight bars provide a wider beam angle, which is ideal for low-speed off-roading, while spotlight bars offer a narrower beam angle and are better suited for high-speed driving. It’s also important to consider the brightness and color temperature of the LED lights, as well as the durability and waterproof rating of the bar. By taking these factors into account, you can choose an LED light bar that will provide optimal visibility and performance for your ATV.
Choose the Right Location for the Light Bar

When it comes to installing an ATV LED light bar, one of the most crucial aspects is choosing the right location for it. The location you choose will significantly impact the effectiveness of the light bar and the overall visibility it provides. Hence, it is crucial to select a site that offers maximum coverage and illumination. Generally, most ATV owners opt for the top of the vehicle, as it provides the most comprehensive view of the terrain ahead. However, it is essential to ensure that the location you choose does not obstruct the rider’s view or create any blind spots. Another crucial factor to consider when choosing a location for your ATV LED light bar is the wiring. The location you choose should be easily accessible and allow for proper wiring of the light bar. Ideally, it would be best to select a location that is close to the ATV’s battery and other essential electrical components. This will help to ensure that the wiring is neat, tidy, and secure, and that there is minimal chance of damage to the wiring due to the rough terrain. By considering these factors, you can choose the perfect location for your ATV LED light bar, ensuring optimal visibility and the most effective lighting possible.
When installing an LED light bar on your ATV, selecting the best location for it is crucial. Factors to consider include visibility, functionality, and durability. The light bar should not obstruct your view while riding. Additionally, it should be placed where it can serve its intended purpose, such as illuminating the trail ahead or providing extra lighting while working. Durability is also essential, as the light bar should be resistant to dust, water, and impact. Lastly, be mindful of the wiring and ensure that the location selected can accommodate the necessary electrical connections. By considering these factors, you can ensure that your LED light bar is installed in the best location possible, enhancing your riding experience and improving your ATV’s functionality.
When riding an ATV, it is important to ensure proper alignment and visibility to avoid accidents and stay safe. One tip is to install an LED light bar, which can provide bright and clear illumination even in low-light conditions. Another tip is to adjust the handlebars and seat position to ensure a comfortable and ergonomic riding posture, which can help improve visibility and reduce strain on the body. Additionally, it is important to regularly check the ATV’s brakes, tires, and other components to ensure they are in good working condition, as this can also affect alignment and visibility while riding. By following these tips, ATV riders can enjoy a safer and more enjoyable riding experience.
Mount the LED Light Bar

Mounting the LED light bar on your ATV is a crucial step in the installation process. Before you start, make sure you have all the necessary tools and equipment on hand. Begin by selecting a suitable location for the light bar. This should be a flat surface that is easily accessible and provides a clear view of the road ahead. You can mount the light bar on the front bumper, roof, or even on the handlebars. Once you have decided on the location, mark the mounting holes using a marker or a pen. Use a drill to make holes in the marked spots. Then, attach the mounting brackets to the light bar using screws and nuts. Make sure they are tightened securely. Finally, attach the light bar to the ATV using bolts, washers, and nuts. Mounting the LED light bar on your ATV not only enhances the appearance of your vehicle but also improves safety during night rides. The bright and powerful beams of light emitted by the LED light bar provide increased visibility and help you navigate through challenging terrain. It is important to follow the manufacturer’s instructions carefully when mounting the light bar to ensure it is properly secured and aligned. Additionally, make sure the wiring is properly connected and insulated to prevent accidental damage or short circuits. With the right tools and a little bit of patience, you can easily mount the LED light bar on your ATV and enjoy a safer and more enjoyable riding experience.
Mounting a light bar onto your ATV can be a challenging task, but with the right tools and knowledge, it can be easily accomplished. Firstly, make sure to choose a suitable location for the light bar that does not interfere with the ATV’s operation. Then, gather all the necessary tools and hardware, including a drill and bolts. Begin by drilling holes into the ATV’s frame where you want to place the light bar. Next, mount the light bar onto the ATV’s frame using the bolts and nuts. Finally, connect the wiring harness to the light bar and the ATV’s battery, ensuring that all connections are secure and protected. With these simple steps, you can have a high-quality LED light bar mounted onto your ATV in no time, enhancing your off-road experience and providing better visibility in low-light conditions.
When it comes to installing an ATV LED light bar, ensuring a secure and stable installation is crucial for both safety and functionality. To achieve this, there are a few key tips to keep in mind. First, always use high-quality mounting brackets and hardware that are specifically designed for your ATV model. Additionally, make sure to securely attach the light bar to the brackets and ensure that all wiring is properly routed and protected from damage. It’s also important to check and double-check all connections and wiring before testing the light bar to ensure that everything is functioning properly. By taking the time to follow these tips and ensure a secure and stable installation, you can enjoy brighter, more efficient lighting on your ATV while also staying safe on the trails.
Wiring and Connecting the LED Light Bar
Wiring and connecting the LED light bar is one of the most crucial steps in the ATV LED light bar installation process. It requires a certain level of expertise and knowledge to get it right. Before starting the wiring process, it is essential to gather all the necessary tools and equipment, including a wiring harness, a relay, a fuse, a switch, and a battery. The wiring harness is an essential component that helps to connect the LED light bar to the battery, while the relay and fuse protect the light bar from electrical damage. The switch, on the other hand, controls the on and off of the LED light bar. To start the wiring process, it is necessary to identify the appropriate location to mount the LED light bar. Once the location is determined, the wiring harness should be connected to the LED light bar using the appropriate connectors. The wiring harness should then be connected to the relay, which should be mounted near the battery. The fuse should be connected to the positive terminal of the battery, while the switch should be mounted in a convenient location. Once all the connections are made, it is essential to test the LED light bar to ensure that it is working correctly. Properly wiring and connecting the LED light bar is essential to ensure that it functions correctly and lasts for a long time.
To begin wiring and connecting the light bar to your ATV’s electrical system, first gather all necessary tools such as a wire stripper, crimping tool, electrical tape, and zip ties. Locate the ATV’s battery and disconnect the negative terminal. The light bar usually comes with a wiring harness that includes a relay, switch, and fuse. Connect the relay to the positive terminal of the battery, then run the wiring harness along the frame of your ATV. Use zip ties to secure it in place. Install the switch in a convenient location on the handlebars or dashboard. Connect the switch to the relay using the included wires. Finally, connect the light bar to the wiring harness and test the system. If everything works as expected, reconnect the negative battery terminal and enjoy your new LED light bar.
When it comes to installing an ATV LED light bar, it’s crucial to ensure proper connection and avoid electrical issues. Firstly, make sure to read the instructions carefully and follow the manufacturer’s guidelines. You should also use the appropriate mounting hardware and wiring harness to securely attach the light bar to your ATV. Additionally, ensure that all connections are tight and properly insulated to prevent any shorts or electrical fires. Lastly, it’s important to avoid overloading your ATV’s electrical system by using a relay or switch to control the light bar’s power. By following these tips, you can enjoy a safe and trouble-free installation of your new ATV LED light bar.
Installing an ATV LED light bar can enhance your off-road experience, but it can seem daunting if you don’t know where to start. Here are the key steps involved in installing an ATV LED light bar: First, gather the necessary tools and materials, including a wiring harness, switch, and mounting brackets. Next, select the location for the light bar and securely mount it using the brackets. Then, connect the wiring harness to the battery and run the wires to the switch and light bar. Finally, test the light bar to ensure it is working properly. With these steps, you can easily install an ATV LED light bar and enjoy improved visibility on your next off-road adventure.
It is crucial to follow proper installation procedures when installing an ATV LED light bar to ensure optimal performance and safety. Installing the light bar correctly not only enhances visibility during off-road activities but also prevents the risk of electrical damage and fire hazards. By following the manufacturer’s instructions and using appropriate tools and equipment, you can ensure a secure and stable installation that withstands the rigors of off-road terrain. Neglecting proper installation procedures can result in poor performance, damage to the vehicle, and even accidents. Therefore, it is imperative to prioritize safety and precision when installing an ATV LED light bar to enjoy a smooth and efficient off-road experience.
It’s critical to seek professional assistance if you’re unsure about any stage of your ATV LED light bar installation process. While installing an LED light bar on your ATV can be a fun and rewarding experience, it can also be risky if you don’t have the requisite knowledge or experience. A professional installer can not only assist you in selecting the right light bar for your ATV, but they can also help you with the entire installation process. This will ensure that your light bar is installed correctly and safely, reducing the risk of accidents and injuries. Remember, it’s always better to be safe than sorry, so don’t hesitate to seek professional assistance if you need it.
Conclusion
In conclusion, installing an ATV LED light bar may seem like a daunting task, but with the step-by-step guide provided, it can be made easy and manageable. By following the instructions carefully and ensuring all safety precautions are taken, you can add a powerful and functional addition to your ATV that will enhance your off-road adventures. With the right tools and some patience, you’ll have your LED light bar installed in no time, providing improved visibility and safety on your next off-road excursion. So, don’t hesitate to take on this DIY project and enjoy the benefits of a well-lit ATV ride.