Why LED Light Strips Won’t Turn On: Troubleshooting Tips
LED light strips are an excellent way to add some creative lighting to your home. They are energy-efficient, long-lasting, and can be used in a variety of ways. However, just like any other electronic device, LED light strips can sometimes malfunction and refuse to turn on. This can be frustrating, especially if you are in the middle of a project or need the lights for an event. Fortunately, there are several troubleshooting tips that you can follow to get your LED light strips working again. One of the most common reasons why LED light strips won’t turn on is a problem with the power source. This could be due to a loose connection, a blown fuse, or a tripped circuit breaker. It’s essential to check the power source before moving on to other troubleshooting steps. If the power source is the issue, you can fix it by tightening any loose connections, replacing the fuse, or resetting the circuit breaker. However, if the power source is not the problem, there are several other potential causes that you need to investigate. In this article, we will explore some of the most common reasons why LED light strips won’t turn on and provide some troubleshooting tips to help you get them working again.
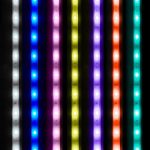
LED light strips are a versatile and energy-efficient lighting option that have gained popularity in recent years. These strips consist of a series of tiny light-emitting diodes (LEDs) that are mounted on a flexible circuit board. They can be cut to custom lengths and come in a range of colors and brightness levels. LED light strips are important because they offer a wide range of applications, from decorative accents in homes and businesses to functional lighting in cars and boats. They are also cost-effective, durable, and easy to install. However, troubleshooting may be necessary if they fail to turn on, and there are several potential causes to be aware of.
There can be several common reasons why LED light strips won’t turn on, and one of the most common ones is a loose or faulty connection. This can be due to a loose wire, a damaged connector, or a defective power supply. Another reason could be an issue with the power source, such as a blown fuse or breaker. Additionally, the LED light strip may have been installed incorrectly, or there may be a problem with the remote control or the controller. It’s important to troubleshoot these issues systematically, starting with checking the power source and connections, and then moving on to testing each component until the problem is identified and resolved.
Check the Power Source

When troubleshooting LED light strips that won’t turn on, it’s essential to start with the basics, and that includes checking the power source. A faulty or disconnected power source is one of the most common reasons why LED light strips won’t turn on. To check the power source, start by ensuring that the power outlet is functioning correctly by plugging in another device. If the power outlet is working, check the power supply unit (PSU) for any visible damage or loose connections. The PSU is responsible for converting the AC power from the outlet into DC power that the LED light strips can use. If the PSU is damaged, consider replacing it with a new one. If the connections are loose, try tightening them to see if that resolves the issue. Another factor to consider when checking the power source is the voltage requirements of the LED light strips. Ensure that the power supply unit’s output voltage matches the LED light strips’ input voltage. If the voltage doesn’t match, the LED light strips won’t turn on. Additionally, check the power source for any power surges or fluctuations, which can damage the LED light strips. Consider using a surge protector to protect the LED light strips from any power anomalies. In conclusion, checking the power source is the first step in troubleshooting LED light strips that won’t turn on. By ensuring that the power outlet is functioning correctly, checking the PSU for any damage or loose connections, and verifying the voltage requirements, you can quickly identify and resolve any power-related issues.
One common reason why LED light strips won’t turn on is due to a faulty power source. To check if the power source is working, begin by unplugging the LED light strip and examining the power supply unit. Look for any signs of damage or wear and tear, including frayed cords or loose connections. Next, use a multimeter to test the voltage output of the power supply unit. If the voltage output is within the recommended range, then the power source is likely not the issue. However, if the voltage output is too low or non-existent, then the power source needs to be replaced or repaired. It’s important to ensure that the power source is working correctly, as it’s a crucial component in powering LED light strips.
If your LED light strip is not turning on, the first thing to check is the power source. If the power source is not working, you should start by checking the power outlet and making sure it is functioning properly. If the outlet is working but the LED light strip still won’t turn on, you may need to check the power supply or transformer that is connected to the LED light strip. It is also important to check the connections between the power source, power supply, and LED light strip to make sure they are all securely connected. If the power source is not working, it may need to be replaced or repaired in order to get your LED light strip up and running again.
Using the correct power source is crucial when it comes to LED light strips. It can make all the difference in the proper functioning of the lights and can also help avoid potential damage to the LED strip. The power source must match the specifications of the LED light strip in terms of voltage, amperage, and wattage. Failure to use the correct power source can result in various problems, including flickering, dimming, or even permanent damage to the LED lights. Therefore, it is essential to carefully check the power requirements of your LED light strip before connecting it to a power source to ensure that it operates correctly and lasts longer.
Check the Connections
One of the most common reasons why your LED light strips won’t turn on is because of poor connections. Whether you’re using connectors, wires, or power adapters, it’s essential to check the connections to ensure they’re secure and functioning correctly. Loose or damaged connections can prevent the flow of electricity, which can lead to a malfunctioning lighting system. Therefore, before looking for other solutions, make sure to check the connections thoroughly. Start by checking the power source and the power adapter. Ensure that the power source is plugged in correctly, and the adapter is securely connected to the strip. If the connections are loose or damaged, this can result in power fluctuations, which can cause your lights to flicker or not turn on at all. Also, check the connectors and wires to see if they’re properly connected and free of any damage. Ensure that the connectors are tightly locked onto the strip, and the wires are not frayed or bent. By checking the connections, you can quickly identify any issues and fix them before they cause further problems.
When troubleshooting LED light strips that won’t turn on, it’s essential to check if the connections are secure. Start by unplugging the power source and examining the connections between the power supply, controller, and LED strip. Look for loose or damaged wires, improper soldering or crimping, and loose screws or connectors. Ensure that the wires are properly connected and that the polarity is correct. Use a multimeter to test the voltage output of the power supply and ensure that it matches the voltage requirements of the LED strip. Once all connections have been checked and tightened, plug in the power source and test the LED light strip to see if it turns on.
Loose connections can cause LED light strips to malfunction, and it’s crucial to fix them to ensure proper functioning of the strips. Firstly, turn off the power source and unplug the strip. Inspect the wiring connections and ensure they’re properly secured. If there are any loose connections, tighten them using a screwdriver or pliers. In case of damaged wires, cut them carefully and strip the ends before reconnecting them. It’s advisable to use electrical tape or wire nuts to secure the wires and prevent them from coming apart. Once you’ve fixed the loose connections, plug the strip back in and turn on the power source to check if it’s working correctly.
One of the most important aspects to consider when dealing with LED light strips that won’t turn on is the proper connection. A proper connection ensures that the electricity flows smoothly from the power source to the LED light strips. Otherwise, electrical issues like short circuits or voltage drops may occur, leading to malfunctions or failures. It is essential to make sure that the wires are connected tightly and correctly, and the power source is compatible with the LED light strips’ voltage requirements. Ignoring the importance of proper connection may result in costly repairs or replacements, and even pose safety hazards. Therefore, it is crucial to pay attention to the connection during installation and maintenance to ensure the LED light strips work efficiently and effectively.
Check the Wiring

When troubleshooting LED light strips that won’t turn on, one of the first things to check is the wiring. This is because issues with wiring can cause a disruption in the electrical flow, leading to a lack of power to the LED lights. Before checking the wiring, it’s important to ensure that the LED light strip is properly connected to a power source and that the power source is functioning correctly. Once these steps have been taken, it’s time to inspect the wiring. To check the wiring, start by examining the connections between the LED light strip and the power source. Loose or improperly connected wires can cause a lack of power to the LED lights, so be sure to tighten any loose connections. If the connections appear to be secure, move on to inspecting the wiring itself. Look for any frayed or damaged wires, as these can cause a disruption in the electrical flow. If any damage is found, the wiring will need to be replaced. It’s also important to ensure that the wiring is properly insulated to prevent any electrical shorts. By checking the wiring, you can eliminate one potential cause of LED light strips that won’t turn on and move on to other troubleshooting steps if necessary.
If your LED light strips are not turning on, there may be an issue with the wiring. Checking the wiring is a crucial step in troubleshooting the problem. To do this, start by examining the power supply and ensuring that it is properly plugged in and switched on. Next, inspect the wiring connections between the power supply and the LED light strips, checking for any loose or damaged connections. Use a multimeter to test for continuity and voltage at various points along the wiring to identify any potential issues. If you find any damaged or faulty wiring, replace it with a new section of wire and secure all connections tightly. By thoroughly checking the wiring, you can identify and resolve any issues preventing your LED light strips from turning on.
If you find that the wiring of your LED light strip is damaged, it is essential to take action immediately to avoid potential hazards. Begin by disconnecting the damaged portion of the wiring from the power source. Next, inspect the wiring for any visible signs of damage such as frayed or exposed wires. If the damage is minor, you may be able to repair it with electrical tape. However, if the damage is severe, it may be necessary to replace the entire strip or contact a professional electrician for assistance. Never attempt to use a damaged LED light strip as it can result in electrical shock or even cause a fire.
Proper wiring is essential for the safe and efficient functioning of any electrical system. In the case of LED light strips, faulty wiring can cause a range of problems, from flickering lights to complete failure to turn on. Poorly wired circuits can also pose a serious fire hazard, putting both property and people at risk. It’s vital to ensure that all connections are properly secured and that wires are properly insulated to prevent any accidental contact. Additionally, it’s important to use the correct wire gauge for the amount of power being drawn to avoid overloading the circuit. By taking the time to ensure proper wiring, you can avoid many common LED light strip issues and ensure a safe and long-lasting lighting solution.
Check the Controller
One of the common reasons why LED light strips won’t turn on is a faulty controller. The controller is responsible for regulating the voltage and current that runs through the LED lights. A malfunctioning controller can cause the lights to flicker, dim, or not turn on at all. To check the controller, start by inspecting the wiring connections between the controller and the LED strip. Ensure that the wires are in good condition and tightly connected. If there are visible signs of damage or loose connections, replace the wiring or fix the connections to see if the lights turn on. Another way to check the controller is to use a multimeter to test the voltage and current. Connect the multimeter to the power source and the controller to see if the correct voltage and current are flowing. If the readings are not within the range recommended for the LED light strip, then it’s likely that the controller is faulty and needs to be replaced. It’s essential to use a compatible controller for the LED light strip to avoid damaging the lights or the controller. Checking the controller is an important step in troubleshooting LED light strips that won’t turn on, and it’s worth taking the time to ensure that it’s working correctly.
If you are experiencing issues with your LED light strips not turning on, one of the first things you should check is the controller. The controller is responsible for sending signals to your LED light strips, so it’s crucial to ensure that it’s functioning correctly. Start by checking that the controller is properly connected to the power source and that all cables are securely attached. If everything seems to be in order, try resetting the controller by disconnecting it from the power source and then reconnecting it after a few seconds. If the problem persists, consider replacing the controller with a new one to see if that resolves the issue. By taking these steps, you can troubleshoot the controller and determine whether it’s the source of your LED light strip problems.
If you are experiencing issues with your LED light strips not turning on, one possible culprit could be a malfunctioning controller. In this case, there are a few steps you can take to troubleshoot the issue. First, try unplugging the controller and plugging it back in to see if that resets it. If that doesn’t work, check to make sure all connections are secure and that the controller is receiving power. If the issue persists, it may be time to replace the controller altogether. Remember to always exercise caution when working with electrical components and to consult a professional if you are unsure of what to do.
The proper usage of a controller is crucial when dealing with LED light strips. Controllers are responsible for regulating the flow of electricity to the LED lights and can be the cause of many issues, including failure to turn on. It is important to use the correct type of controller for the specific LED light strip being used and to ensure that the wiring is properly connected. In addition, understanding the various settings and functions of the controller is essential for achieving the desired lighting effect. Neglecting proper controller usage can result in malfunctioning LED lights and potential safety hazards. Therefore, it is imperative to take the time to read the instructions and use the controller correctly to ensure that the LED light strips operate efficiently and effectively.
Proper usage and maintenance of LED light strips are crucial for their longevity and performance. LED light strips are a popular lighting solution that can be used in various settings such as homes, offices, and commercial spaces. However, failure to use them properly or maintain them can lead to various issues such as flickering, dimming, and even failure to turn on. Regular cleaning and checking for loose connections can help prevent these issues. It is also important to use the right power supply, avoid overloading the circuit, and ensure proper voltage input. By following these best practices, you can ensure that your LED light strips function optimally and provide the desired lighting effect.
If your LED light strips won’t turn on, there are a few final tips to consider. First, make sure that the power supply is the correct voltage for your LED lights. If the power supply is too high or too low, it can cause the lights to malfunction. Additionally, check the wiring connections to ensure they are secure and properly connected. If the wiring is loose or disconnected, the lights won’t turn on. Another tip is to inspect the LED light strips themselves for any visible damage or defects. If there are any visible issues, such as broken or burnt-out bulbs, it may be necessary to replace the entire strip. Lastly, check the controller to ensure it is working properly and not malfunctioning. By following these final tips, you can troubleshoot the issue and get your LED light strips working again.
Conclusion

In conclusion, troubleshooting LED light strips that won’t turn on can be frustrating but with the right approach, it can be resolved. From checking the power source, ensuring proper connections, examining the controller, and testing the LED strip itself, there are several steps to take in identifying the root cause of the problem. By implementing these tips, one can successfully diagnose and fix the issue, ultimately enjoying the benefits of LED lighting once again. It’s important to remember that LED light strips are a convenient and energy-efficient option for illuminating any space, and with proper maintenance and care, they can last for many years to come.