Mastering Your Monster LED Light Strip: A StepbyStep Guide to Programming the Remote
Lighting has always been an essential part of our lives. From the very beginning of time, man has always found ways to illuminate his surroundings. Today, technology has made it possible to control the lighting in our homes and offices using LED light strips. These strips are not only energy-efficient but also provide a wide range of colors to set whatever mood you desire. However, it can be challenging to program the remote that comes with your LED light strip. Fear not, for this guide will walk you through the process step-by-step and help you master your monster LED light strip. The first step in mastering your monster LED light strip is to understand the basics of how it works. LED light strips are made up of small individual lights that are controlled by a central controller. This controller communicates with the remote to change the color, brightness, and other settings of the lights. To program the remote, you need to understand the different buttons and what they do. This guide will explain each button in detail and how you can use them to get the most out of your LED light strip. With this knowledge, you will be able to create the perfect lighting for any occasion.
The article titled \Mastering Your Monster LED Light Strip A Step-by-Step Guide to Programming the Remote\ provides a comprehensive guide for individuals who want to learn how to program their LED light strip remote. The article begins by discussing the importance of LED light strips and their growing popularity, particularly in home decor. It then delves into the basics of LED light strip remote programming, including how to turn the lights on and off, adjust the brightness, and change colors. The article also covers more advanced features, such as setting up custom color schemes and creating animated displays. Overall, the purpose of the article is to provide a clear and concise guide for anyone who wants to take full control of their LED light strip and create stunning lighting effects in their home or workspace.
Understanding Your LED Light Strip
An LED light strip can be a great addition to any space, whether it’s for accent lighting or task lighting. But before you start programming your remote, it’s important to understand the basics of your LED light strip. First, you need to know the type of LED chips used in your light strip. There are two main types of LED chips: SMD and COB. SMD (Surface Mounted Device) chips are smaller and more versatile, allowing for more flexibility in the design of the light strip. COB (Chip-On-Board) chips are larger and produce more heat, but also produce brighter and more uniform light. Knowing which type of LED chips your light strip uses can help you make informed decisions when it comes to programming and controlling the brightness and color of your lights. Another important factor to consider is the color temperature of your LED light strip. Color temperature is measured in Kelvin (K) and indicates the hue of the light emitted by the LED chips. Lower Kelvin temperatures (around 2700K) produce warmer, yellowish light, while higher Kelvin temperatures (around 5000K) produce cooler, bluish light. Color temperature can have a big impact on the mood and ambiance of a space, so it’s important to choose the right temperature for your needs. Additionally, some LED light strips offer the ability to adjust the color temperature, allowing you to fine-tune the lighting to your preferences. By understanding these basic features of your LED light strip, you can make the most of its capabilities and create the perfect lighting for your space.
LED light strips consist of several components, including LEDs, resistors, copper conductors, and an adhesive backing. The LED, or light-emitting diode, is the most crucial component, as it emits light when an electric current passes through it. Resistors are installed to regulate the current and ensure that the LEDs do not burn out quickly. Copper conductors are the pathways for the electricity to travel to the various LEDs, and the adhesive backing allows the strip to be mounted on any surface. The basic function of an LED light strip is to provide lighting that can be controlled remotely, allowing for customization of colors, brightness, and patterns. With proper programming of the remote, users can create a variety of lighting effects to suit their mood or occasion.
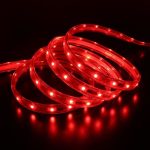
LED light strips come in various types, each with different features that cater to specific lighting needs. The most common types of LED light strips include RGB, RGBW, and White LED strips. RGB LED strips are the most versatile as they offer a wide range of color options, allowing users to change the ambiance of their space with ease. RGBW LED strips feature a dedicated white LED chip, which produces brighter and more natural white light. White LED strips, on the other hand, produce a warm or cool white light, making them ideal for task lighting. Additionally, LED strips come in different lengths and densities, providing flexibility in installation and customization. Some LED strips also feature waterproofing, making them suitable for outdoor and bathroom installation.
Setting Up Your LED Light Strip

Setting up your LED light strip is an exciting and creative endeavor that can transform any room into a vibrant and personalized space. Before starting the installation process, it is essential to gather all the necessary tools and materials, including the LED light strip, power supply, remote control, and connectors. Once you have everything you need, it’s time to plan where you want to install the LED light strip and determine the length required to cover the designated area. Make sure to measure twice to avoid any mistakes and ensure that the LED light strip fits perfectly. Once you have measured and cut the LED light strip to the desired length, it’s time to install it. The first step is to clean the surface where you will be attaching the strip to ensure it adheres correctly. Next, remove the adhesive backing from the LED light strip and attach it to the surface, making sure to apply even pressure to ensure it sticks. If you are installing the LED light strip on a curved surface, it’s essential to use connectors to ensure the strip bends smoothly. Finally, connect the power supply to the LED strip, and you’re ready to turn on your new LED light strip and enjoy the ambiance it creates.
Installing and connecting an LED light strip may seem daunting at first, but with a step-by-step guide, it can be a breeze. Firstly, ensure that you have all the necessary tools and equipment, including the LED light strip, a power supply, and a controller. Next, measure the length of the area where you want to install the LED strip and cut the strip to size. After cleaning the surface where the strip will be installed, peel off the adhesive backing and stick the strip in place. Lastly, connect the power supply and the controller to the LED strip and power it on. With these simple steps, you can enjoy the vibrant and customizable lighting of your LED light strip.
Proper placement and positioning of your LED light strip are crucial to achieving the desired lighting effect. First, ensure that the surface where you will be attaching the strip is clean and dry. Avoid placing the strip where it will be exposed to moisture or direct sunlight. Additionally, consider the distance between the strip and the power source to avoid voltage drop. When positioning the strip, pay attention to the directional arrows on the strip to ensure that you are installing it in the correct orientation. Finally, consider using clips or adhesive tape to secure the strip in place and prevent it from sagging or falling off over time. By following these tips, you can ensure that your LED light strip provides optimal lighting and lasts for years to come.
Programming Your Remote
Programming your remote is a vital step in mastering your monster LED light strip. The remote control allows you to customize the colors, brightness, and patterns of your LED light strip. Without programming your remote, you won’t be able to control the LED light strip, and it will remain static in one color. Programming your remote is easy, and it only takes a few minutes. To program your remote, you need to follow the instructions in the user manual that came with the LED light strip. The user manual will provide you with step-by-step instructions on how to program your remote. Once you have programmed your remote, you can start experimenting with the different colors and patterns of your LED light strip. You can choose from a wide range of colors, including red, green, blue, yellow, purple, and white. You can also adjust the brightness of the LED light strip to suit your needs. If you want a romantic ambiance, you can choose a soft pink or purple color and reduce the brightness. If you want a party atmosphere, you can choose a bright red or green color and increase the brightness. With the remote control, you can also select different patterns, such as fade, strobe, and flash. The possibilities are endless, and you can create a unique ambiance that suits your mood and style.
The remote control for your LED light strip is an essential tool for customizing and adjusting the lighting in your room. It features a range of buttons and features that enable you to create the perfect ambiance for any occasion. The on/off button is the most basic and important of them all, allowing you to turn the lights on and off at will. The brightness button lets you control the intensity of the lighting, while the color button allows you to choose from a wide range of colors to suit your mood or preference. The speed button is useful for creating dynamic light shows, while the mode button lets you switch between different lighting modes, including flashing and fading. Finally, the DIY button is a powerful feature that allows you to create your own custom lighting effects using the remote control. With these features at your fingertips, you’ll be able to create a truly immersive lighting experience in your home.
If you’re looking to take control of your monster LED light strip, programming the remote is an essential step. Fortunately, it’s a straightforward process that can be accomplished with just a few steps. First, ensure that you have fresh batteries in the remote and that it’s pointed directly at the control box. Then, press and hold the power button until the lights on the strip turn off and then back on. Next, use the color buttons to select your desired hue, and the brightness buttons to adjust the intensity. You can also use the mode button to cycle through different lighting effects. With a little experimentation and practice, you’ll be able to program your monster LED light strip to create the perfect ambiance for any occasion.
Customizing your LED light strip settings can be an exciting and creative task. To start, consider the mood or atmosphere you want to create in your space, whether it be a relaxing ambiance or an energetic vibe. Experiment with different color combinations and brightness levels to achieve the desired effect. Additionally, try different settings such as strobe, fade, and flash to add variety and interest to your lighting design. Don’t be afraid to get creative and try new things. With a little experimentation and practice, you can master your LED light strip and create a dynamic and personalized lighting experience for your home or workspace.
Troubleshooting Common Issues

Troubleshooting common issues with your monster LED light strip can be frustrating, but with a few simple tips, you can easily resolve any problems. One common issue is that the LED lights don’t turn on, even though the power is on. This can be caused by a loose connection or a faulty power supply. To fix this issue, start by checking the power supply and ensuring it’s properly connected to the LED strip. If that doesn’t work, check the connections between the LED strip and the power supply, making sure they’re tight and secure. If the issue persists, you may need to replace the power supply or the LED strip. Another common issue is that the LED lights flicker or don’t display the correct colors. This can be caused by interference from other electronic devices or a faulty remote control. To fix this issue, start by moving any electronic devices away from the LED strip to reduce interference. If that doesn’t work, try resetting the remote control by removing the batteries and holding down the power button for 30 seconds before replacing the batteries. If the issue persists, you may need to replace the remote control or the LED strip. By following these troubleshooting tips, you can easily resolve common issues with your monster LED light strip and enjoy your customized lighting experience.
LED light strips are popular for their ease of use and versatility. However, they can encounter a few problems that can hinder their performance. One of the most common issues is that some LED lights may not work, or sections of the strip may flicker or dim. This could be due to poor connections, incorrect power supply or a damaged LED. To solve this, ensure that the strip is properly connected and powered, and check for any damaged LED. Another common problem is the inability of the remote to control the lights. This could be due to a damaged remote or a poor connection between the remote and the light strip. To fix this, ensure that the remote is in good condition and that the connection is secure. By being aware of these common issues and their solutions, you can enjoy the full benefits of your LED light strip.
To maintain and prolong the lifespan of your LED light strip, there are a few tips to keep in mind. Firstly, make sure to properly install the strip and avoid bending it too much or damaging the adhesive backing. Next, avoid exposing the strip to extreme temperatures, moisture, and direct sunlight. It’s also important to use the correct power supply and not overload the strip with too many LEDs. Finally, regularly clean the strip with a soft cloth to remove dust and debris. By following these tips, your LED light strip can last for years, providing bright and vibrant lighting for your home or workspace.
The article titled \Mastering Your Monster LED Light Strip: A Step-by-Step Guide to Programming the Remote\ provides a comprehensive guide to programming your LED light strip remote control. The article outlines easy-to-follow steps that help users navigate the remote’s features and functions, including setting up the remote, selecting colors and modes, and adjusting brightness levels. The article also offers tips on troubleshooting common issues, such as connectivity and power problems. The key takeaways from the article include the importance of understanding the remote’s capabilities, practicing patience, and exploring different features to create unique and personalized lighting effects. Overall, the article provides a valuable resource for anyone looking to master their LED light strip and create stunning lighting displays.
Congratulations on programming your LED light strip! Now, it’s time to have some fun and experiment with the endless possibilities of colors and patterns. Don’t be afraid to try new combinations and adjust the brightness and speed settings to your liking. Let your creativity run wild and see what unique lighting effects you can create. Remember that this is your chance to express yourself and make your space truly your own. So, grab your remote, turn up the music, and let your imagination guide you as you master your monster LED light strip.
Conclusion
In conclusion, mastering your monster LED light strip can be a daunting task, but with this step-by-step guide to programming the remote, it becomes a breeze. By following the instructions carefully and taking the time to experiment with different settings, you can create a stunning and unique lighting display that will impress all who see it. From the basics of changing colors to advanced programming techniques, this guide has everything you need to take your LED light strip to the next level. Whether you’re looking to create a relaxing ambiance in your home or a vibrant atmosphere for a party, this guide is sure to help you achieve your goals. So go ahead and get started – your monster LED light strip is waiting for you!